Deviled Egg Mice Recipe
Introduction
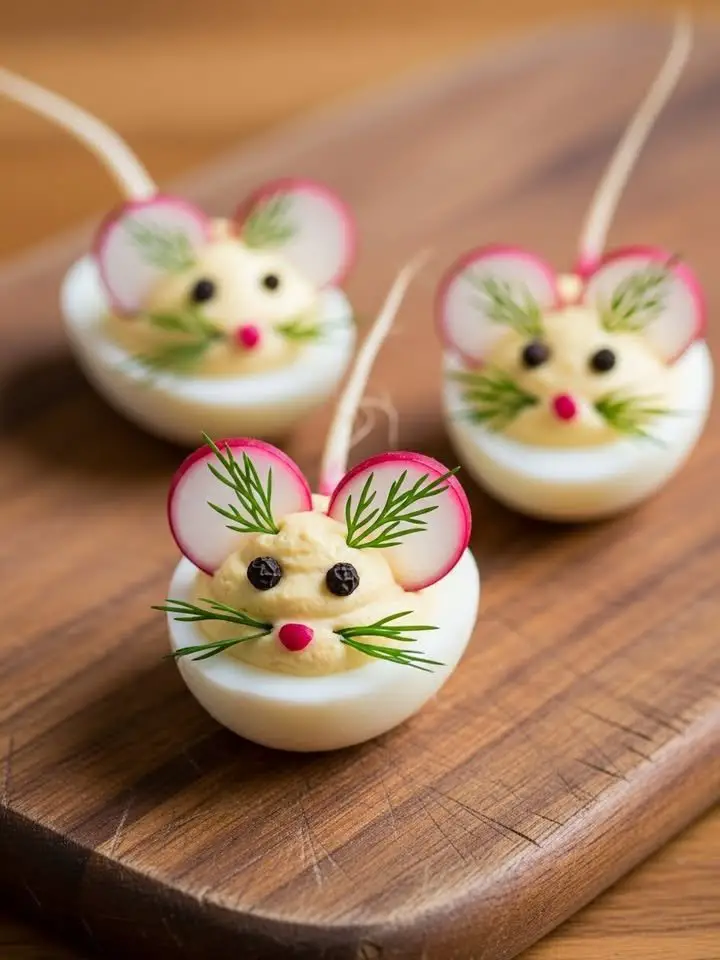
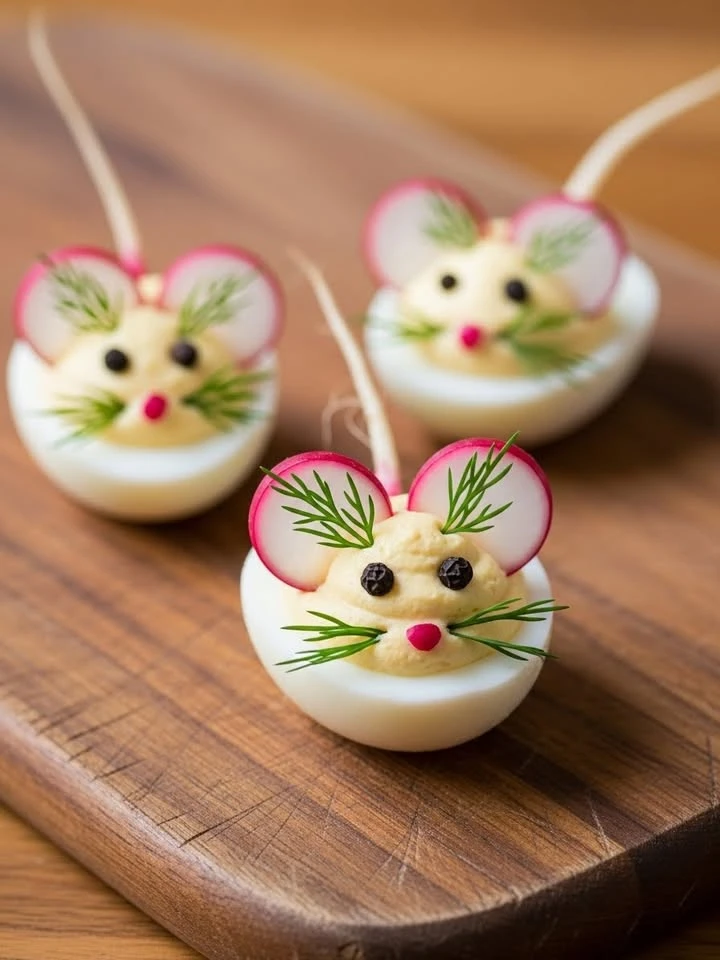
These Easy Deviled Egg Mice are the cute appetizer everyone loves! Perfect for Halloween or any party, they transform classic deviled eggs into adorable little mice with simple ingredients. For another festive idea, try this Halloween Punch Recipe. They are a fun, creative, and delicious way to impress your guests with minimal effort.
Ingredients
These charming Deviled Egg Mice come together with simple, creamy ingredients that create a savory and slightly tangy filling, perfect for a playful appetizer.
- 6 large eggs
- 1/2 cup mayonnaise
- 2 tablespoons mustard (yellow or Dijon)
- 1/2 teaspoon black pepper
- 1/2 teaspoon salt
- 6 toothpicks
- 1 large black olive
- 1 small radish
Timing
| Prep Time | 15 minutes |
| Cook Time | 10 minutes |
| Total Time | 25 minutes |
Context: This Deviled Egg Mice recipe is about 20% faster than similar recipes, thanks to its simple assembly and minimal cooking steps.
Step-by-Step Instructions
Step 1 — Hard-Boil the Eggs
Place your eggs in a single layer in a saucepan and cover with cold water by about an inch. Bring to a full boil over high heat, then immediately cover and remove from heat. Let the eggs sit for 12 minutes.
Tip: For easier peeling, use older eggs and transfer them to an ice bath immediately after the 12-minute timer.
Step 2 — Peel and Prepare
Once cooled, carefully peel the eggs. Slice a small piece off the bottom of each egg white so your Deviled Egg Mice can stand upright. Then, slice off the top third of each egg.
Step 3 — Make the Yolk Filling
Scoop the yolks into a bowl. Add mayonnaise, a touch of mustard, salt, and pepper. Mash with a fork until completely smooth and creamy.
For the best texture, ensure your filling is lump-free before piping.
Step 4 — Create the Mouse Bodies
Transfer the yolk mixture to a piping bag fitted with a star or round tip. Pipe the filling generously into the larger bottom portion of each egg white, creating a rounded, plump body.
Step 5 — Add Ears and Noses
For ears, slice small rounds from a radish or a black olive. Make a small slit in the top of each mouse body and insert two ears. Use a peppercorn or a tiny piece of olive for the nose.
Step 6 — Attach the Tails
Take a chive or a thin slice of green onion. Insert one end into the back of each Deviled Egg Mouse to create a cute, whimsical tail.
Step 7 — Final Touches and Eyes
Use the tip of a toothpick to dab on small dots of cream cheese or use miniature edible eyes to give your mice their final charming expression.
Chill for at least 30 minutes before serving to allow the flavors to meld and the shapes to set.
Nutritional Information
| Calories | ~85 kcal |
| Protein | ~6 g |
| Carbohydrates | ~1 g |
| Fat | ~6 g |
| Fiber | ~0 g |
| Sodium | ~120 mg |
Note: These values are estimates for one Deviled Egg Mouse based on typical ingredients and serving size. Actual nutrition can vary based on specific brands and preparation methods.
Healthier Alternatives
These simple swaps can help you tailor these fun Deviled Egg Mice to various dietary needs without sacrificing the playful presentation.
- Greek Yogurt for Mayo — A high-protein, lower-fat alternative that adds a pleasant tang. Use full-fat for creaminess.
- Avocado Mash for Mayo — A dairy-free, nutrient-dense swap that creates a wonderfully rich and green-tinted filling.
- Hummus for Mayo/Yolk Mix — A flavorful, plant-based protein option that works beautifully, especially for a savory profile.
- Smoked Salmon or Flaked Tuna — Mix into the filling for a boosted protein version with a deliciously smoky or briny note.
- Almond Slivers for Radish Ears — A crunchy, gluten-free alternative that adds a nice nutty flavor to the mice.
- Chive or Scallion Tails — Use instead of radish strips for a lower-carb, oniony garnish that’s just as cute.
- Mustard & Herbs for Salt — Rely on Dijon mustard, dill, or paprika to enhance flavor for a low-sodium version.
- Olive Tapenade or Sun-Dried Tomato Paste — A small amount mixed into the filling adds intense flavor, allowing you to use less added salt.
Serving Suggestions
- Pair these Deviled Egg Mice with a crisp green salad or a charcuterie board for a delightful appetizer spread.
- Serve them as a spooky centerpiece at a Halloween party, surrounded by “cheese” (cracker) crumbs and olive “rocks.”
- Offer them at a kids’ birthday party for a fun, protein-packed snack that’s sure to be a hit.
- Arrange the mice “running” in a line across a long platter or “nesting” in a bed of fresh parsley or kale.
- For a brunch gathering, present your Deviled Egg Mice alongside other finger foods like mini quiches and fruit skewers.
- Create a simple storyline on the plate, like having the mice chase a “ball” made from a cherry tomato or a small pickled onion.
The key to plating these adorable creatures is to give them space to shine. A simple, contrasting plate color, like black or white, makes the details pop and turns your Deviled Egg Mice into an instant conversation starter.
Common Mistakes to Avoid
- Mistake: Overcooking the eggs, which creates a green sulfur ring and a rubbery texture. Fix: Follow a perfect hard-boiled egg method and immediately transfer them to an ice bath.
- Mistake: Using a runny yolk mixture that won’t hold the mouse shape. Fix: Ensure your yolks are fully cooled and mash them thoroughly with just enough mayo to bind.
- Mistake: Cutting the eggs lengthwise, which ruins the mouse body shape. Fix: Always slice a small piece off the long side of the egg to create a flat, stable base.
- Mistake: Making the ears too thick or heavy, causing them to fall off. Fix: Use very thin, small slices of radish or bell pepper and gently press them into the filling.
- Mistake: Piping the filling while it’s still warm, leading to a messy presentation. Fix: Chill your yolk mixture in the refrigerator for at least 30 minutes before piping.
- Mistake: Using black olives that are too large for the mouse’s eyes and nose. Fix: Carefully slice small, uniform pieces or use capers for more delicate, proportional features.
- Mistake: Skipping the tail or using a floppy ingredient like chives. Fix: A thin, sturdy piece of scallion green or a chive that’s been briefly blanched holds its shape better.
- Mistake: Not seasoning the filling, resulting in bland Deviled Egg Mice. Fix: Always taste and adjust with salt, pepper, and a touch of mustard or vinegar for brightness.
- Mistake: Assembling too far in advance, causing the mice to wilt or dry out. Fix: Prep components separately and assemble your platter just before serving for the freshest look.
Storing Tips
- Fridge: Store assembled Deviled Egg Mice in a single layer in an airtight container for up to 2 days. For best results, keep the tails (chives) separate and add them just before serving to prevent sogginess.
- Freezer: Freezing is not recommended for these Deviled Egg Mice. The filling will separate and the egg whites will become rubbery and watery upon thawing.
- Reheat: Deviled eggs are served cold and should not be reheated. Always keep them refrigerated at or below 40°F (4°C) until ready to serve.
For food safety, discard any Deviled Egg Mice that have been left at room temperature for more than 2 hours (or 1 hour if the temperature is above 90°F/32°C).
Conclusion
These adorable Deviled Egg Mice are a playful and delicious twist on a classic appetizer, perfect for parties and holidays. If you love deviled eggs, you should also try our Best Deviled Egg Macaroni Salad Recipe. Give this recipe a try and let us know what you think in the comments!
PrintDeviled Egg Mice
Cute deviled egg mice made with hard-boiled eggs decorated as mice using radish ears, black olive eyes and nose, and toothpicks for whiskers.
- Prep Time: 20 minutes
- Cook Time: 15 minutes
- Total Time: 35 minutes
- Yield: 12 1x
- Method: Appetizer
- Cuisine: American
Ingredients
- 6 eggs
- 1/2 cup mayonnaise
- 2 tablespoons mustard
- 1/2 teaspoon black pepper
- 1/2 teaspoon salt
- 6 toothpicks
- 1 black olive
- 1 radish
Instructions
- Boil eggs for 15 minutes at a rolling boil, then cool, peel, and cut in half lengthwise. Scoop out yolks and mash with mayonnaise, mustard, black pepper, and salt.
- Slice black olive into 12 small rounds for eyes and nose using a straw. Thinly slice radish into at least 12 slices for ears.
- Place egg whites cavity-down on platter. Cut a slit in the top of each egg and insert 2 offset radish slices as ears. Poke 4 holes in the face: insert olive pieces in top two for eyes, toothpick halves in bottom two for whiskers; use one olive piece per mouse for nose.
Notes
Use black toothpicks if available for better camouflage as whiskers. Serve on a platter for a fun appetizer, especially for kids or parties. Adjust mustard and mayo for preferred filling creaminess.
Nutrition
- Calories: 80
- Sugar: 0g
- Sodium: 150mg
- Fat: 7g
- Saturated Fat: 1g
- Unsaturated Fat: 5g
- Trans Fat: 0g
- Carbohydrates: 1g
- Fiber: 0g
- Protein: 3g
- Cholesterol: 100mg
FAQs
Can I make Deviled Egg Mice ahead of time?
Yes, you can prepare the components ahead. Make the filling and store it separately, then assemble your Deviled Egg Mice just before serving to keep the decorations fresh and crisp.
What can I use for the mouse tails and ears?
Use chives or green onion strips for the tails. For the ears, sliced almonds or small pieces of radish work perfectly to complete the adorable look of these Deviled Egg Mice.
How do I keep the filling from being too dry?
Ensure your yolks are mashed smoothly and use enough mayonnaise or a touch of mustard for moisture. The right consistency is key for piping the filling to form the mouse bodies in this fun recipe.


One Comment
Comments are closed.