Introduction
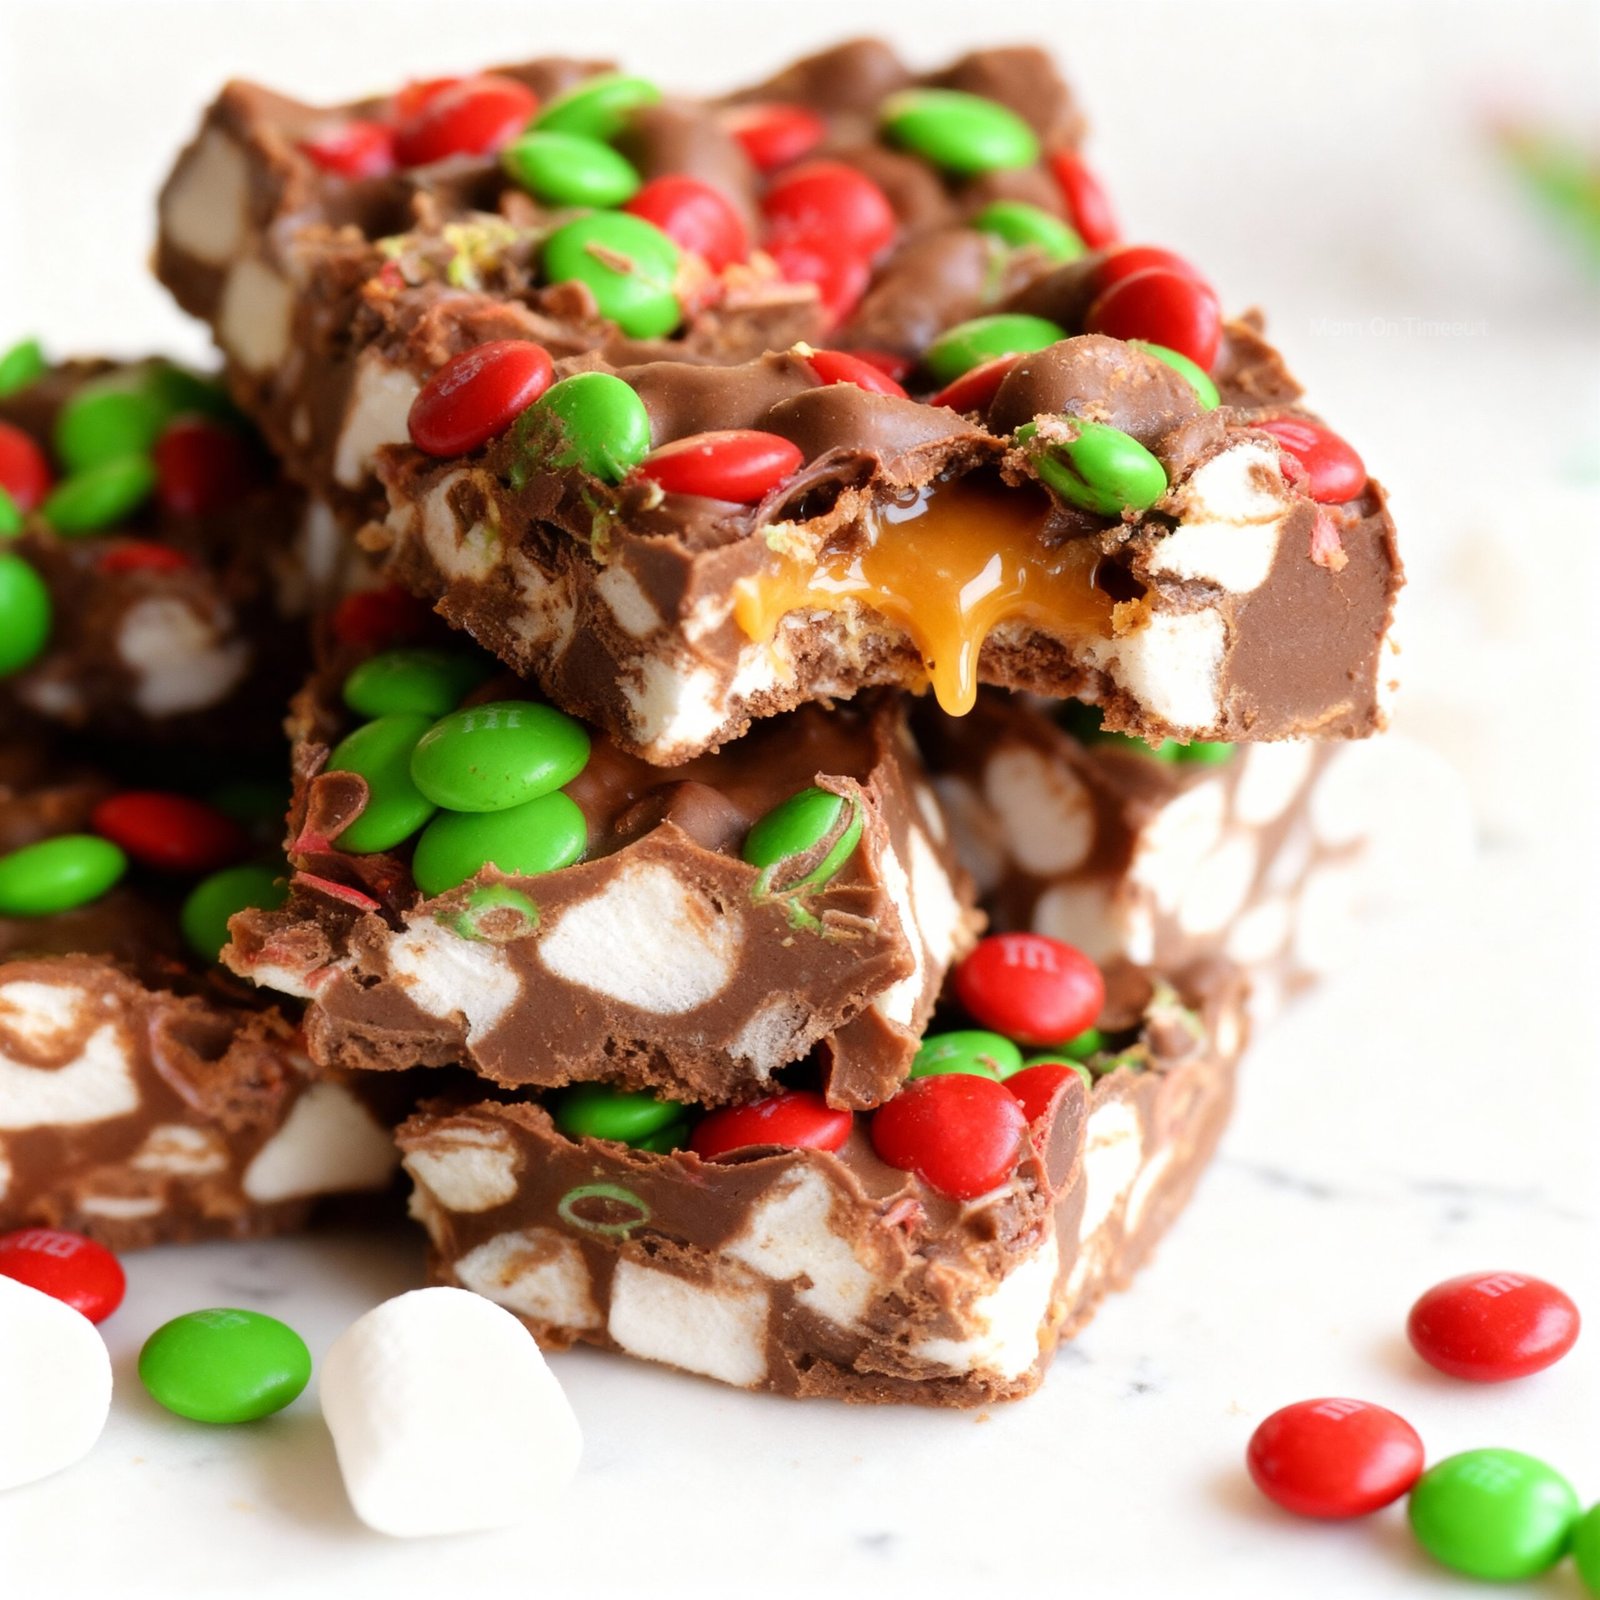
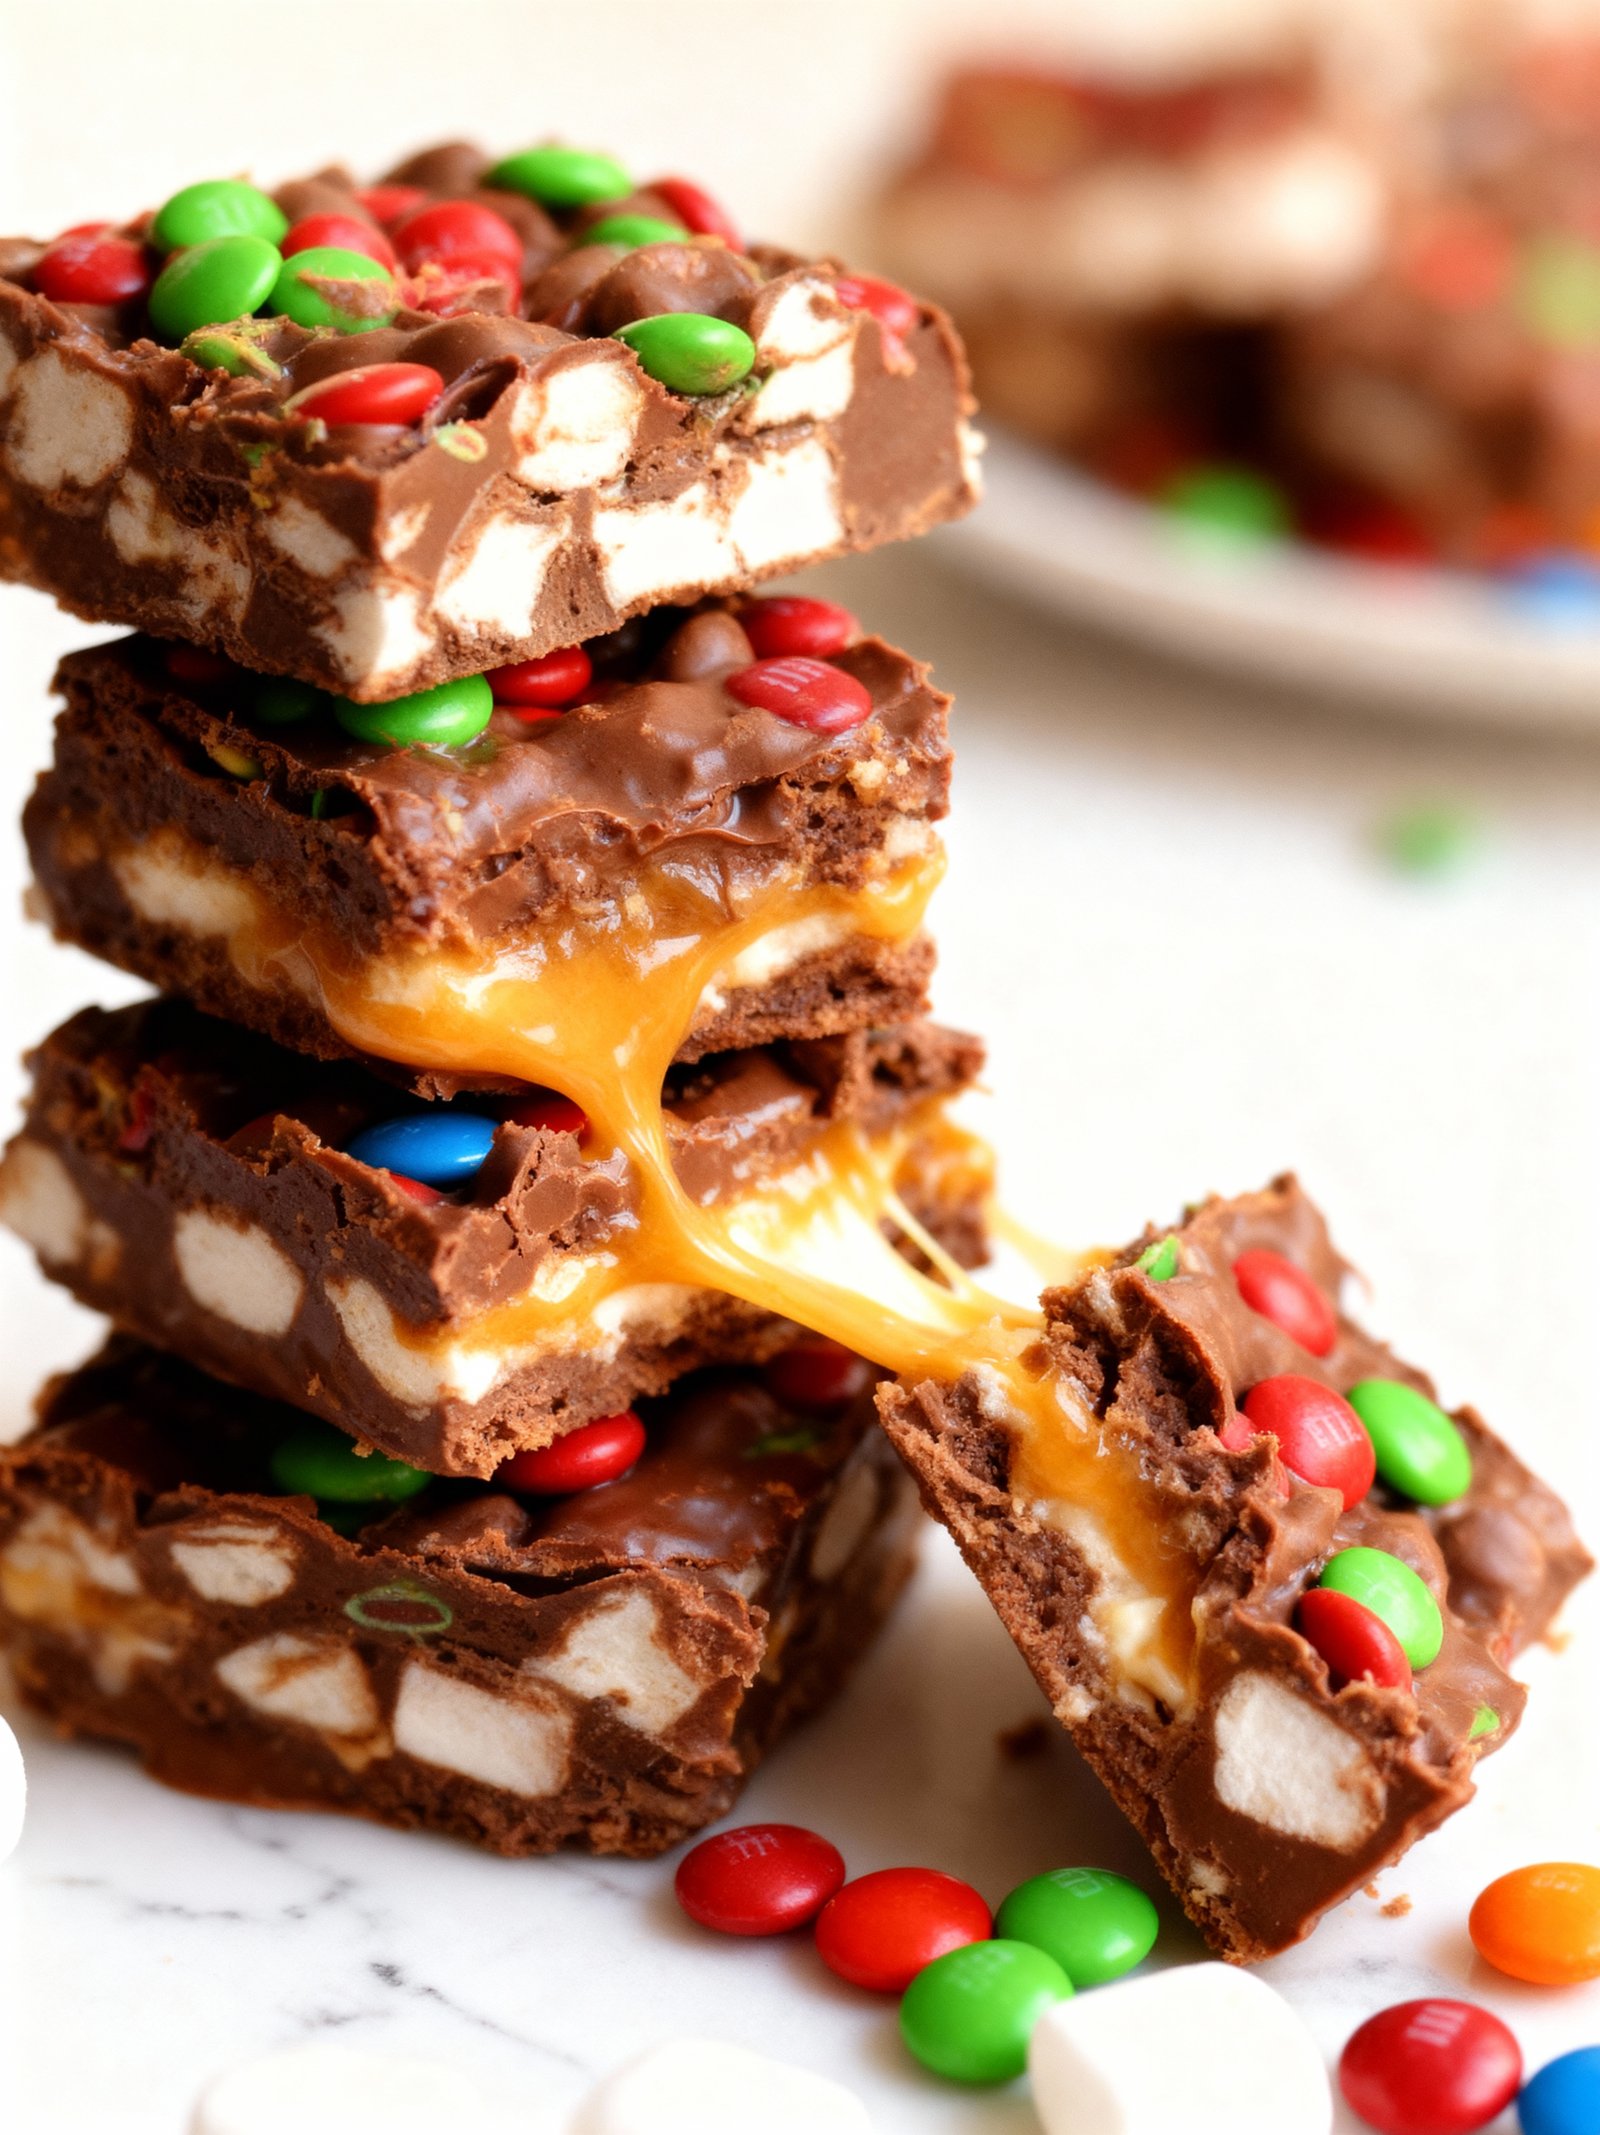
These Ultimate M&M Marshmallow Bars are the perfect quick dessert with just 5 minutes of prep! Featuring colorful M&Ms and fluffy marshmallows in a buttery base, they’re ideal for parties, potlucks, or a sweet family treat. If you love easy marshmallow desserts, try this Creamy Caramel Marshmallow Cups Recipe or this No Bake Popcorn Cake Recipe for more simple ideas.
Ingredients
These dreamy bars combine creamy peanut butter, rich chocolate, butterscotch, and fluffy marshmallows for a treat that’s chewy, sweet, and utterly irresistible.
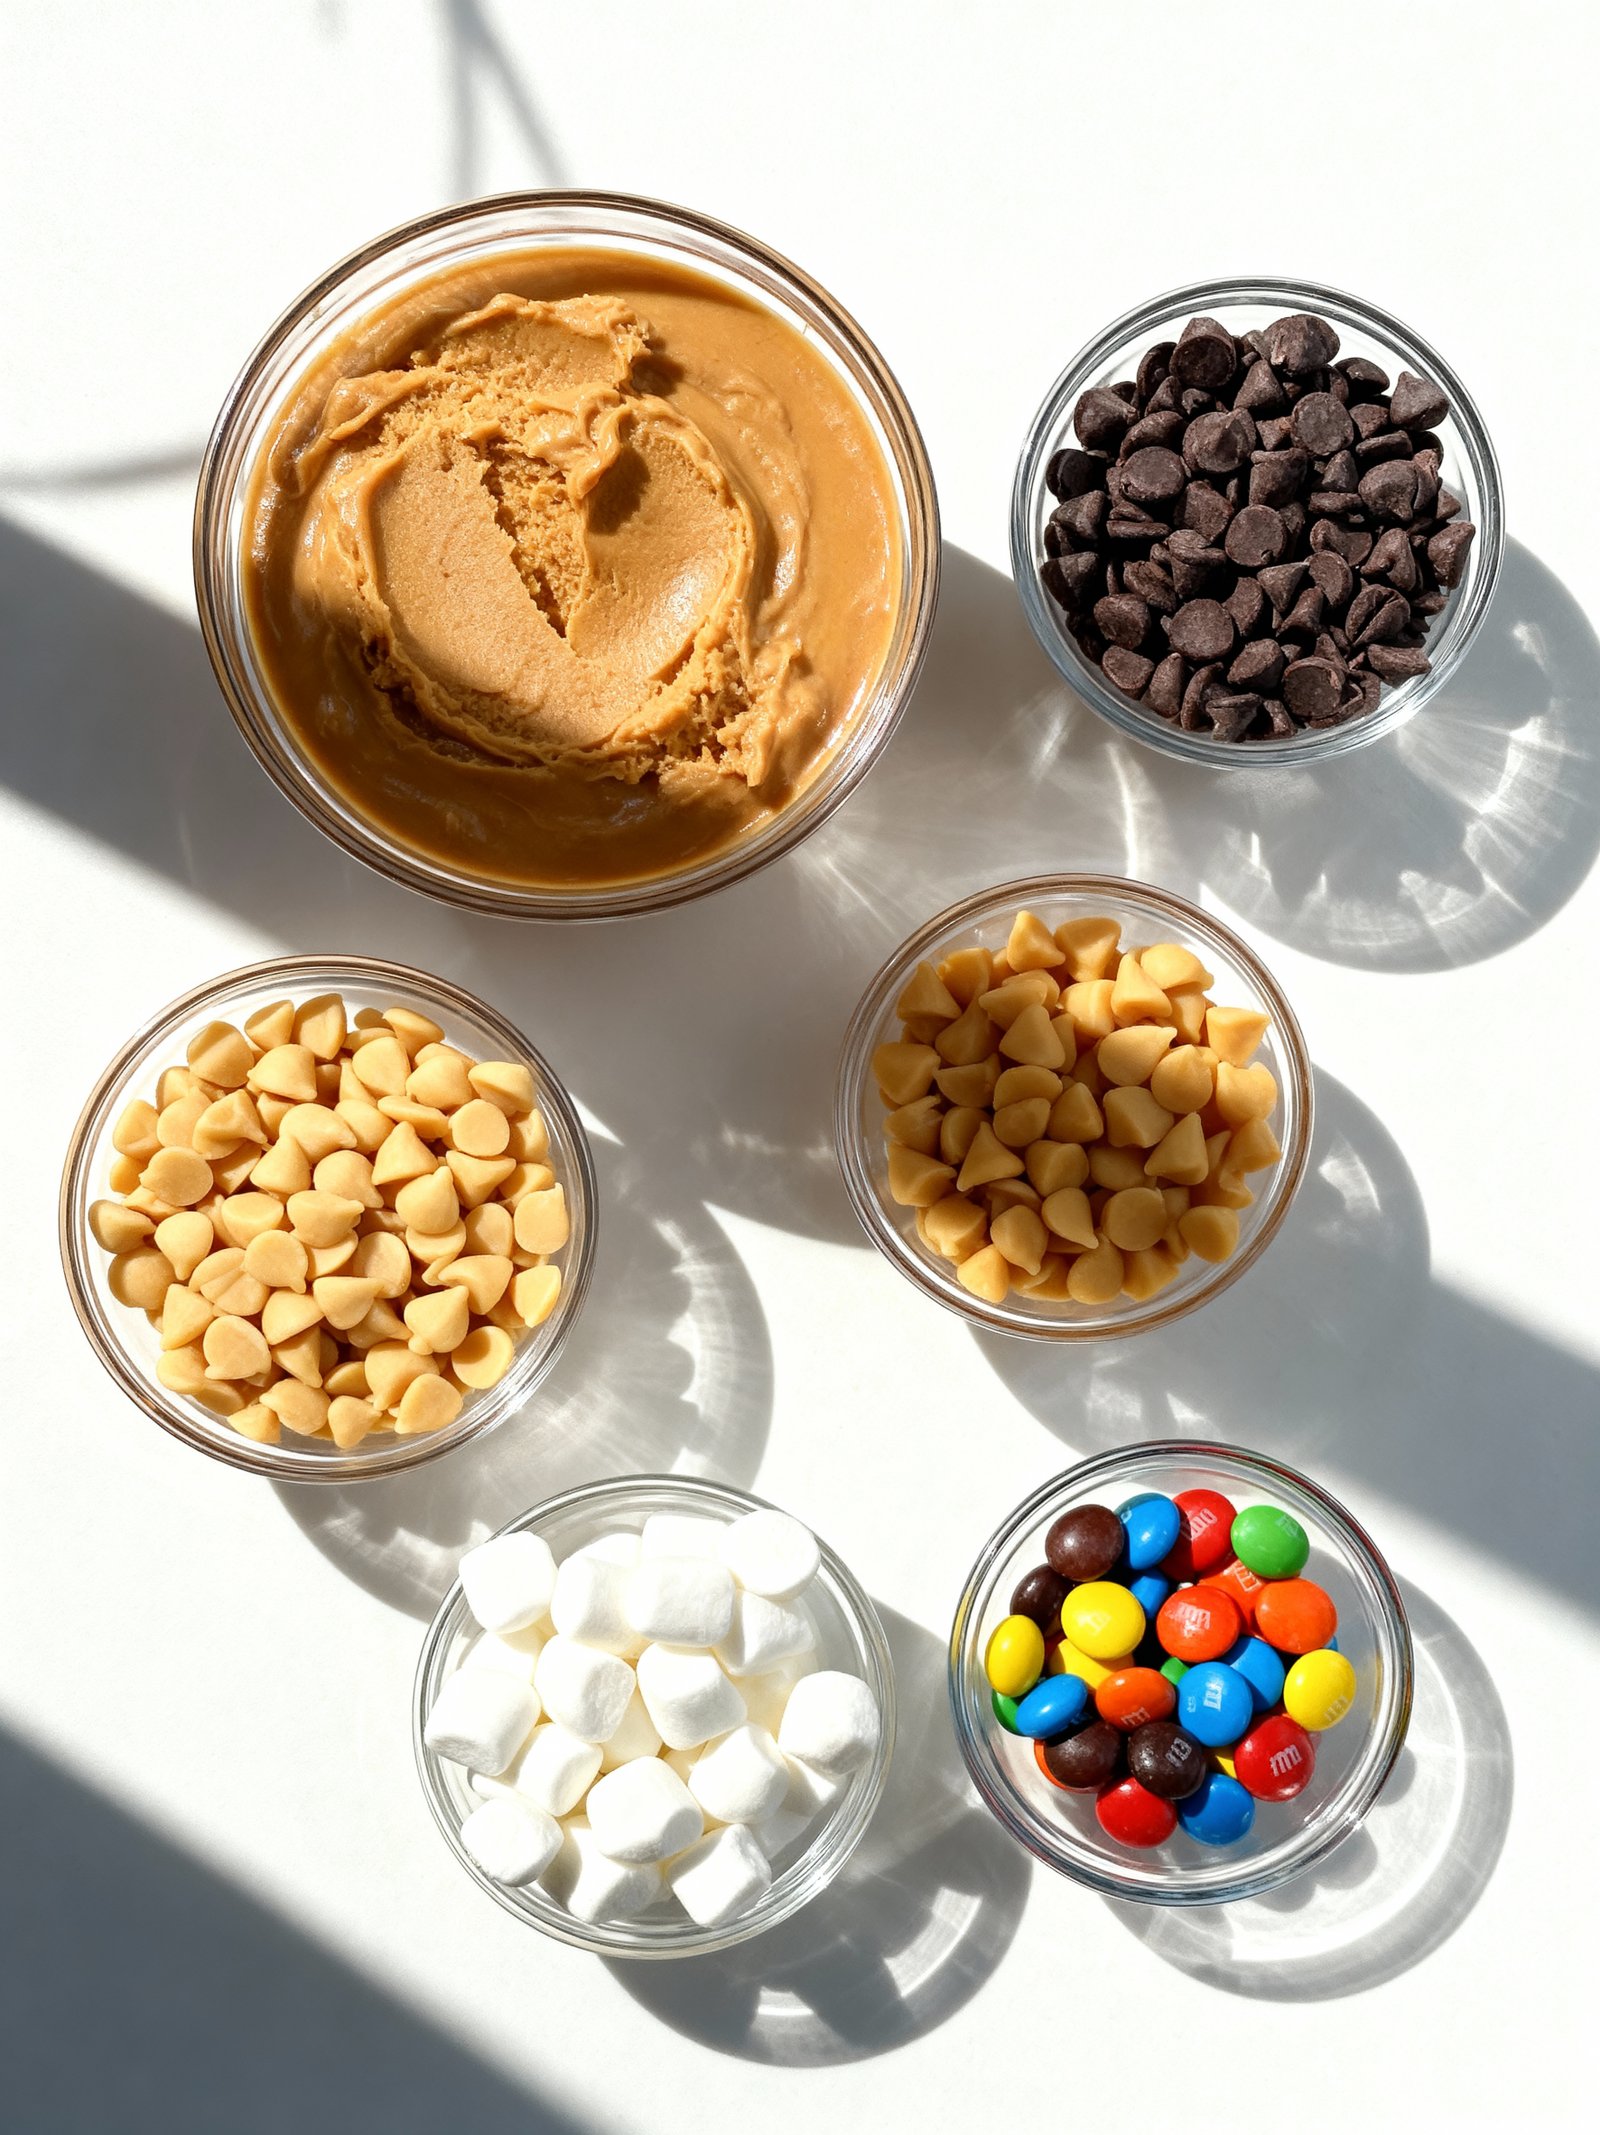
- 1 cup creamy peanut butter
- 12 oz package semi-sweet chocolate chips
- 11 oz package butterscotch chips
- 10 oz mini marshmallows
- M&Ms for topping (optional)
Timing
| Prep Time | 15 minutes |
| Cook Time | 25 minutes |
| Total Time | 40 minutes |
Context: These M M M Marshmallow Dream Bars come together about 25% faster than similar bar recipes thanks to their simple no-mixer method.
Step-by-Step Instructions
Step 1 — Prepare Your Baking Pan
Line a 9×13-inch baking pan with parchment paper, leaving an overhang on two opposite sides for easy removal later. Lightly grease the parchment with non-stick cooking spray or butter to ensure your M M M Marshmallow Dream Bars release cleanly.
Step 2 — Create the Crust
In a medium bowl, combine 2 cups of graham cracker crumbs with ½ cup of melted butter and ¼ cup of granulated sugar. Stir until the mixture is evenly moistened and resembles wet sand.
Press this mixture firmly and evenly into the bottom of your prepared pan. Use the bottom of a flat glass or measuring cup to compact it into a solid, uniform layer.
Step 3 — Bake the Crust
Preheat your oven to 350°F (175°C). Bake the crust for 8–10 minutes, or until the edges are lightly golden and the surface appears set. This pre-baking step helps prevent a soggy bottom in your final M M M Marshmallow Dream Bars.
Step 4 — Melt the Marshmallows and Chocolate
In a large, microwave-safe bowl, combine one 10-ounce bag of mini marshmallows and 2 cups of semi-sweet chocolate chips. Microwave on high in 30-second intervals, stirring thoroughly after each, until the mixture is completely smooth and melted.
For best results, do not overheat. Stop microwasing when just a few lumps remain—the residual heat will melt them as you stir.
Step 5 — Combine and Spread the Filling
Once the marshmallow-chocolate mixture is smooth, quickly fold in 1 cup of crispy rice cereal. Work swiftly before the mixture begins to set.
Immediately pour the filling over your warm, pre-baked crust. Use a greased spatula to spread it into an even layer, working from the center outward.
Step 6 — Add the Topping and Cool
Sprinkle ½ cup of M&M’s candies evenly over the top of the warm marshmallow layer, gently pressing them in so they adhere.
Allow the pan to cool completely at room temperature for at least 2 hours. For faster setting, you can refrigerate the pan for about 1 hour until firm.
Step 7 — Slice and Serve
Once fully set, use the parchment paper overhang to lift the entire block of M M M Marshmallow Dream Bars from the pan. Place it on a cutting board.
Use a sharp knife to slice into bars. For clean cuts, wipe the knife blade clean between slices. Serve immediately or store in an airtight container.
Nutritional Information
| Calories | 280 |
| Protein | 3g |
| Carbohydrates | 45g |
| Fat | 11g |
| Fiber | 1g |
| Sodium | 180mg |
Note: Estimates based on typical ingredients and serving size.
Healthier Alternatives
- Protein powder — Replace some flour with vanilla or unflavored protein powder for a protein boost without compromising the sweet flavor.
- Almond flour — Use almond flour instead of all-purpose flour for a gluten-free, lower-carb option with a nutty taste.
- Coconut oil — Swap butter for coconut oil to make these M M M Marshmallow Dream Bars dairy-free while adding a subtle tropical note.
- Sugar-free marshmallows — Choose sugar-free marshmallows to reduce overall sugar content while keeping the classic gooey texture.
- Dark chocolate chips — Opt for dark chocolate chips instead of milk chocolate for less sugar and a richer, more intense chocolate flavor.
- Low-sodium butter — Use low-sodium butter or a salt-free alternative to cut down on sodium without affecting the buttery richness.
- Oat flour — Substitute regular flour with oat flour for a gluten-free alternative that adds a wholesome, slightly chewy consistency.
- Maple syrup — Replace granulated sugar with pure maple syrup for a natural sweetener that introduces a warm, caramel-like undertone.
Serving Suggestions
- Pair these sweet M M M Marshmallow Dream Bars with a glass of cold milk or a hot cup of coffee to balance the richness.
- Serve at birthday parties or family gatherings where their colorful appearance adds festive cheer.
- Bring them to potlucks or bake sales—they travel well and always disappear quickly.
- Offer as a fun after-school snack that kids will love, especially alongside fresh fruit like apple slices.
- Cut into small squares for elegant dessert platters at holiday parties or bridal showers.
- Top with a scoop of vanilla ice cream for an indulgent dessert that highlights the gooey marshmallow texture.
For a beautiful presentation, arrange your M M M Marshmallow Dream Bars on a decorative plate or cake stand, and consider dusting with powdered sugar just before serving.
Common Mistakes to Avoid
- Mistake: Using stale marshmallows that don’t melt smoothly. Fix: Always use fresh, soft marshmallows for a perfectly gooey texture in your M M M Marshmallow Dream Bars.
- Mistake: Overheating the marshmallow mixture, causing it to become tough. Fix: Melt marshmallows over low heat, stirring constantly until just smooth.
- Mistake: Pressing the crust too firmly into the pan. Fix: Press the base gently to maintain a crumbly, tender texture that complements the soft topping.
- Mistake: Adding mix-ins like cereal or chocolate when the marshmallow is too hot. Fix: Let the melted marshmallow cool slightly to prevent ingredients from melting or getting soggy.
- Mistake: Not greasing the pan adequately, leading to bars that stick. Fix: Line your pan with parchment paper and grease it lightly for easy removal and clean cuts.
- Mistake: Skipping the cooling step and cutting bars while still warm. Fix: Allow M M M Marshmallow Dream Bars to cool completely at room temperature for neat, defined slices.
- Mistake: Using butter that’s too cold, resulting in a dry, crumbly crust. Fix: Use room-temperature butter to help the crust ingredients bind together properly.
- Mistake: Overmixing the crust, which can make it tough. Fix: Mix just until the ingredients are combined to keep the base light and delicate.
Storing Tips
- Fridge: Store M M M Marshmallow Dream Bars in an airtight container for up to 5 days. Refrigerate promptly to maintain freshness and food safety.
- Freezer: Wrap individual bars tightly in plastic wrap and place in a freezer-safe container for up to 3 months. Thaw in the refrigerator before serving.
- Reheat: Warm refrigerated M M M Marshmallow Dream Bars in a 300°F oven for 5–7 minutes until heated through. Ensure the internal temperature reaches at least 165°F for food safety.
Proper storage keeps your M M M Marshmallow Dream Bars delicious and safe to enjoy for days or months to come.
Conclusion
These M&Ms Marshmallow Dream Bars are a fun, colorful treat that’s sure to be a hit. If you love easy no-bake desserts, try our Peanut Butter Avalanche Popcorn Treats or Pina Colada Fluff next! We’d love to hear how your bars turned out—leave a comment or subscribe for more sweet recipes.
PrintM&Ms Marshmallow Dream Bars

A 5-ingredient festive Christmas treat with smooth and silky chocolate, butterscotch, peanut butter and loaded with fluffy little marshmallows
- Prep Time: 5 minutes
- Cook Time: 5 minutes
- Total Time: 65 minutes
- Yield: 24 bars 1x
- Method: Dessert
- Cuisine: American
Ingredients
- 1 cup creamy peanut butter
- 12 oz package semi-sweet chocolate chips
- 11 oz package butterscotch chips
- 10 oz mini marshmallows
- M&Ms for topping (optional)
Instructions
- Set up a double boiler with a medium saucepan on high heat with a heat-safe bowl on top
- Add peanut butter to the bowl and begin melting
- Add semi-sweet chocolate chips and butterscotch chips to the bowl, stirring constantly until smooth and melted
- Remove from heat and quickly add mini marshmallows, stirring until coated and combined
- Pour the mixture into a greased 9×13 baking pan
- Press down gently with wax paper sprayed with non-stick spray
- Allow to cool completely at room temperature for about 1 hour
- Cut into bars and serve
Notes
Do not refrigerate these bars – they are best kept at room temperature to remain gooey and delicious. Use a double boiler method to melt chocolate to keep it smooth. Add M&Ms on top before cooling for festive presentation.
Nutrition
- Calories: 220
- Sugar: 24
- Sodium: 95
- Fat: 12
- Saturated Fat: 5
- Unsaturated Fat: 6
- Trans Fat: 0
- Carbohydrates: 28
- Fiber: 1
- Protein: 5
- Cholesterol: 0
FAQs
Can I make M M M Marshmallow Dream Bars ahead of time?
Yes, these bars store well. Keep them in an airtight container at room temperature for up to 3 days. For longer storage, freeze them for up to a month.
What can I use if I don’t have marshmallow creme?
You can substitute with mini marshmallows. Melt them gently with the other ingredients over low heat, stirring constantly until smooth. This ensures your M M M Marshmallow Dream Bars still have that classic texture.
How do I prevent the M M M Marshmallow Dream Bars from being too sticky?
Make sure to let the bars cool completely before cutting. Chilling them in the refrigerator for about an hour will firm them up, making slicing clean and easy.


