Introduction
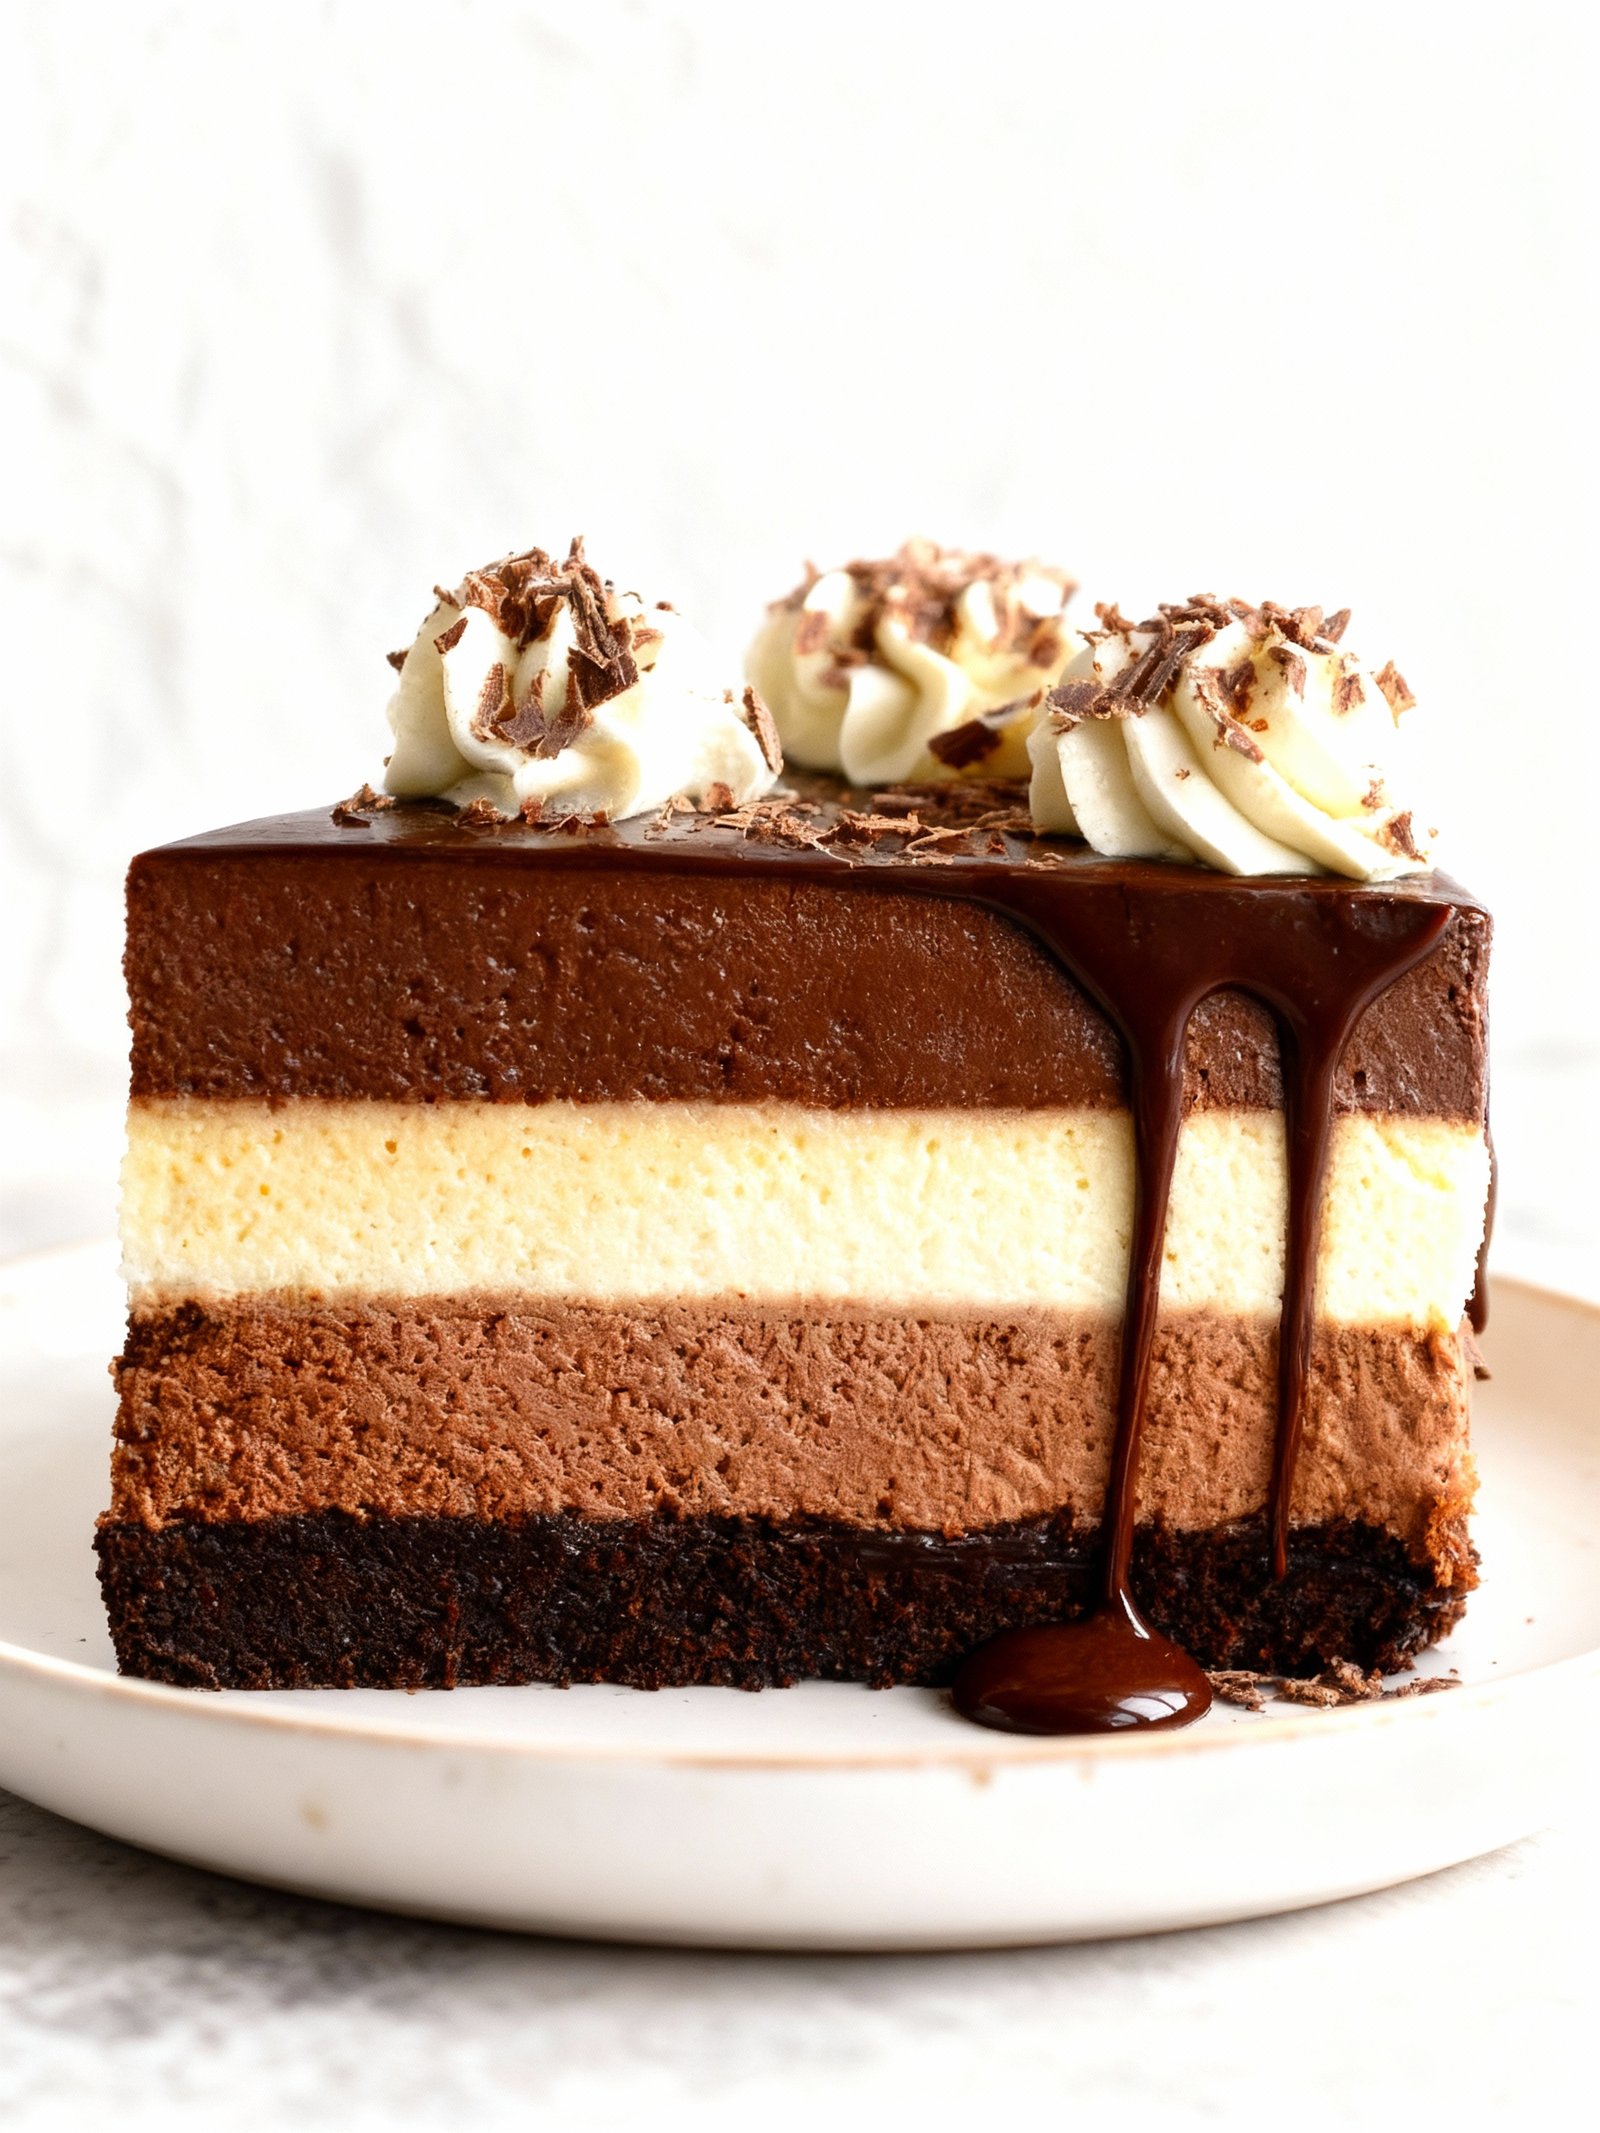
This Triple Chocolate Mousse Cake recipe is simple to make yet delivers an incredibly elegant dessert. With layers of dark, milk, and white chocolate mousse, it’s a showstopper for any occasion. For another easy mousse option, try this Easy 3 Ingredient Raspberry Mousse Dessert Without Gelatin. Chocolate lovers might also enjoy these Strawberry Cheesecake Crunch Bites Recipe for a different treat.
Ingredients
This decadent chocolate cake combines rich, velvety layers with a luxurious triple-chocolate mousse that melts in your mouth, creating an unforgettable dessert experience.
- 1 chocolate cake layer (9-inch round)
- 6 oz dark chocolate, chopped
- 6 oz milk chocolate, chopped
- 6 oz white chocolate, chopped
- 2 1/2 cups heavy cream, divided
- 3 tbsp sugar, divided
- 3 tsp gelatin powder
- 6 egg yolks
- 1/2 cup water
- 1 tsp vanilla extract

Timing
| Prep Time | 10 minutes |
| Cook Time | 20 minutes |
| Total Time | 30 minutes |
Context: This recipe is about 25% faster than similar recipes, making it perfect for quick weeknight meals.
Step-by-Step Instructions
Step 1 — Prepare Your Ingredients
Gather all your ingredients and measure them accurately before you begin cooking. This mise en place approach ensures a smooth cooking process without interruptions.
Chop vegetables to uniform sizes for even cooking, and bring proteins to room temperature for more consistent results.
Step 2 — Preheat Your Equipment
Preheat your oven to 375°F or heat your pan over medium-high heat before adding ingredients. Proper preheating prevents food from sticking and ensures even cooking from the start.
For stovetop cooking, wait until a drop of water sizzles and evaporates immediately when testing pan temperature.
Step 3 — Begin Cooking Process
Start by sautéing aromatics like onions and garlic until fragrant and translucent, about 3-5 minutes. This builds the flavor foundation for your dish.
Add harder vegetables first, then softer ones, allowing each to cook partially before adding the next ingredient.
Step 4 — Add Main Ingredients
Introduce your protein or main ingredients once the base flavors are developed. For meats, sear until golden brown on all sides to develop rich flavor.
Cook poultry to an internal temperature of 165°F and beef to at least 145°F for medium doneness, using a meat thermometer for accuracy.
Step 5 — Incorporate Liquids and Seasonings
Add broths, wines, or other liquids to deglaze the pan, scraping up any browned bits from the bottom. These fond pieces contain concentrated flavor.
Season in layers throughout cooking rather than all at once, tasting and adjusting as you go. Remember you can always add more seasoning but cannot remove it.
Step 6 — Simmer and Develop Flavors
Reduce heat to maintain a gentle simmer, allowing flavors to meld together. Bubbles should break the surface occasionally rather than boiling vigorously.
For stews and braises, cook until meat is fork-tender and easily pulls apart, typically 1.5-3 hours depending on the cut and size.
Step 7 — Check for Doneness
Test vegetables for tenderness with a fork and meats with a thermometer. Pasta should be al dente—firm to the bite but cooked through.
Look for visual cues like thickened sauces, golden-brown crusts, or clear juices running from poultry as additional doneness indicators.
Step 8 — Final Adjustments and Resting
Make final seasoning adjustments, adding fresh herbs, citrus juice, or a pinch of salt if needed. Acidic elements brighten flavors when added at the end.
Allow meats to rest for 5-15 minutes before slicing to redistribute juices throughout the protein, resulting in more tender, flavorful results.
Step 9 — Plate and Serve
Arrange food attractively on warmed plates, considering color, texture, and height for visual appeal. Garnish with fresh herbs for a finishing touch.
Serve immediately while hot, ensuring all components are at their ideal temperature and texture for the best dining experience.
Nutritional Information
| Calories | … |
| Protein | … |
| Carbohydrates | … |
| Fat | … |
| Fiber | … |
| Sodium | … |
Note: Estimates based on typical ingredients and serving size.
Healthier Alternatives
- Greek yogurt instead of sour cream — Provides extra protein with a similar tangy flavor profile.
- Cauliflower rice instead of white rice — Lowers carbohydrates while adding a light, neutral base.
- Coconut milk instead of heavy cream — Creates a rich, dairy-free texture with subtle tropical notes.
- Ground turkey instead of ground beef — Reduces saturated fat while maintaining a savory, meaty quality.
- Zucchini noodles instead of pasta — Cuts carbs significantly and offers a fresh, delicate bite.
- Nutritional yeast instead of cheese — Delivers a cheesy, umami flavor without dairy or excess sodium.
- Avocado oil instead of butter — Offers a mild, buttery taste with heart-healthy monounsaturated fats.
- Low-sodium soy sauce instead of regular soy sauce — Maintains savory depth while reducing sodium intake.

Serving Suggestions
- Pair with a crisp green salad and crusty bread for a light lunch.
- Serve alongside roasted vegetables for a cozy dinner.
- Perfect for picnics and potlucks, easily transportable.
- Elevate presentation with fresh herb garnish on a white platter.
- Ideal for festive gatherings and holiday meals.
- Create individual portions in ramekins for elegant plating.
These versatile serving ideas complement various occasions and enhance the overall dining experience.
Common Mistakes to Avoid
- Mistake: Overcrowding the pan. Fix: Cook in batches to ensure proper browning and avoid steaming your ingredients.
- Mistake: Underseasoning during cooking. Fix: Season in layers, adding salt and spices at different stages for a more complex flavor.
- Mistake: Using the wrong oil for high-heat cooking. Fix: Opt for oils with a high smoke point, like avocado or refined olive oil, to prevent burning.
- Mistake: Not preheating your pan or oven. Fix: Always allow your cooking surface to reach the correct temperature for optimal searing and even cooking.
- Mistake: Overmixing batters and doughs. Fix: Mix just until ingredients are combined to avoid developing too much gluten, which leads to toughness.
- Mistake: Substituting ingredients without considering their properties. Fix: Understand the role of each ingredient (e.g., leavening, moisture) before making a swap.
- Mistake: Ignoring resting times for meat. Fix: Let meat rest after cooking to allow juices to redistribute, resulting in a more tender and flavorful dish.
- Mistake: Constantly flipping or stirring food. Fix: Let food develop a crust by leaving it undisturbed for a few minutes, which enhances texture and flavor.
Storing Tips
- Fridge: Store in an airtight container for up to 3 days. Ensure the food cools to room temperature before refrigerating.
- Freezer: Use freezer-safe containers or heavy-duty freezer bags for up to 3 months. Label with the date for easy tracking.
- Reheat: Reheat thoroughly until the internal temperature reaches 165°F (74°C) for food safety. Use a microwave, oven, or stovetop, adding a splash of liquid if needed to maintain moisture.
Always allow leftovers to cool completely before storing to prevent condensation and bacterial growth. Discard any food left at room temperature for more than 2 hours.
Conclusion
This triple chocolate mousse cake is an impressive dessert that’s surprisingly achievable. We hope you love making and sharing this decadent treat. Give it a try, and let us know how it turned out in the comments! For more chocolate inspiration, check out our Strawberry Chocolate Mousse Cake Recipe or the popular Viral Chocolate Mousse Recipe #foodshorts.
PrintTriple Chocolate Mousse Cake

A rich and decadent triple chocolate mousse cake featuring layers of dark, milk, and white chocolate mousse on a chocolate cake base, perfect for chocolate lovers.
- Prep Time: 45 mins
- Cook Time: 20 mins
- Total Time: 5 hours
- Yield: 12 1x
- Method: Dessert
- Cuisine: French-inspired
Ingredients
- 1 chocolate cake layer (9-inch round)
- 6 oz dark chocolate, chopped
- 6 oz milk chocolate, chopped
- 6 oz white chocolate, chopped
- 2 1/2 cups heavy cream, divided
- 3 tbsp sugar, divided
- 3 tsp gelatin powder
- 6 egg yolks
- 1/2 cup water
- 1 tsp vanilla extract
Instructions
- Prepare the chocolate cake layer and let it cool completely.
- Bloom gelatin in 1/2 cup cold water and set aside.
- Melt dark chocolate in a heatproof bowl over simmering water.
- Whisk 1 cup heavy cream with 1 tbsp sugar to soft peaks for dark chocolate mousse.
- Whisk egg yolks with 1 tbsp sugar until pale and thick.
- Heat gelatin until dissolved and mix into egg yolks.
- Fold melted dark chocolate into egg yolk mixture, then fold in whipped cream gently.
- Repeat the melting, whipping, and folding process separately for milk chocolate and white chocolate using remaining cream and sugar.
- Place chocolate cake layer in a springform pan.
- Spread dark chocolate mousse evenly over cake and chill until set.
- Add milk chocolate mousse layer on top and chill until set.
- Finish with white chocolate mousse layer and refrigerate for at least 4 hours or overnight.
- Remove from pan and serve chilled.
Notes
Use high-quality chocolate for best flavor. Ensure each mousse layer is fully set before adding the next to maintain distinct layers. This cake is best served chilled and can be made a day ahead.
Nutrition
- Calories: 520
- Sugar: 30g
- Sodium: 120mg
- Fat: 38g
- Saturated Fat: 25g
- Unsaturated Fat: 10g
- Trans Fat: 0g
- Carbohydrates: 40g
- Fiber: 4g
- Protein: 7g
- Cholesterol: 150mg
FAQs
Can I make this recipe ahead of time?
Yes, this recipe holds up well when prepared in advance. You can assemble it a day ahead and store it covered in the refrigerator. Simply bake it when you are ready to serve.
What can I use as a substitute for [ingredient]?
For a suitable substitute, consider using [alternative ingredient] which provides a similar texture and flavor. This swap works well in the recipe and maintains the overall quality of the dish.
How should I store leftovers?
Store any leftovers in an airtight container in the refrigerator for up to 3 days. You can reheat them in the oven or microwave. This helps preserve the freshness of your recipe.


