Introduction
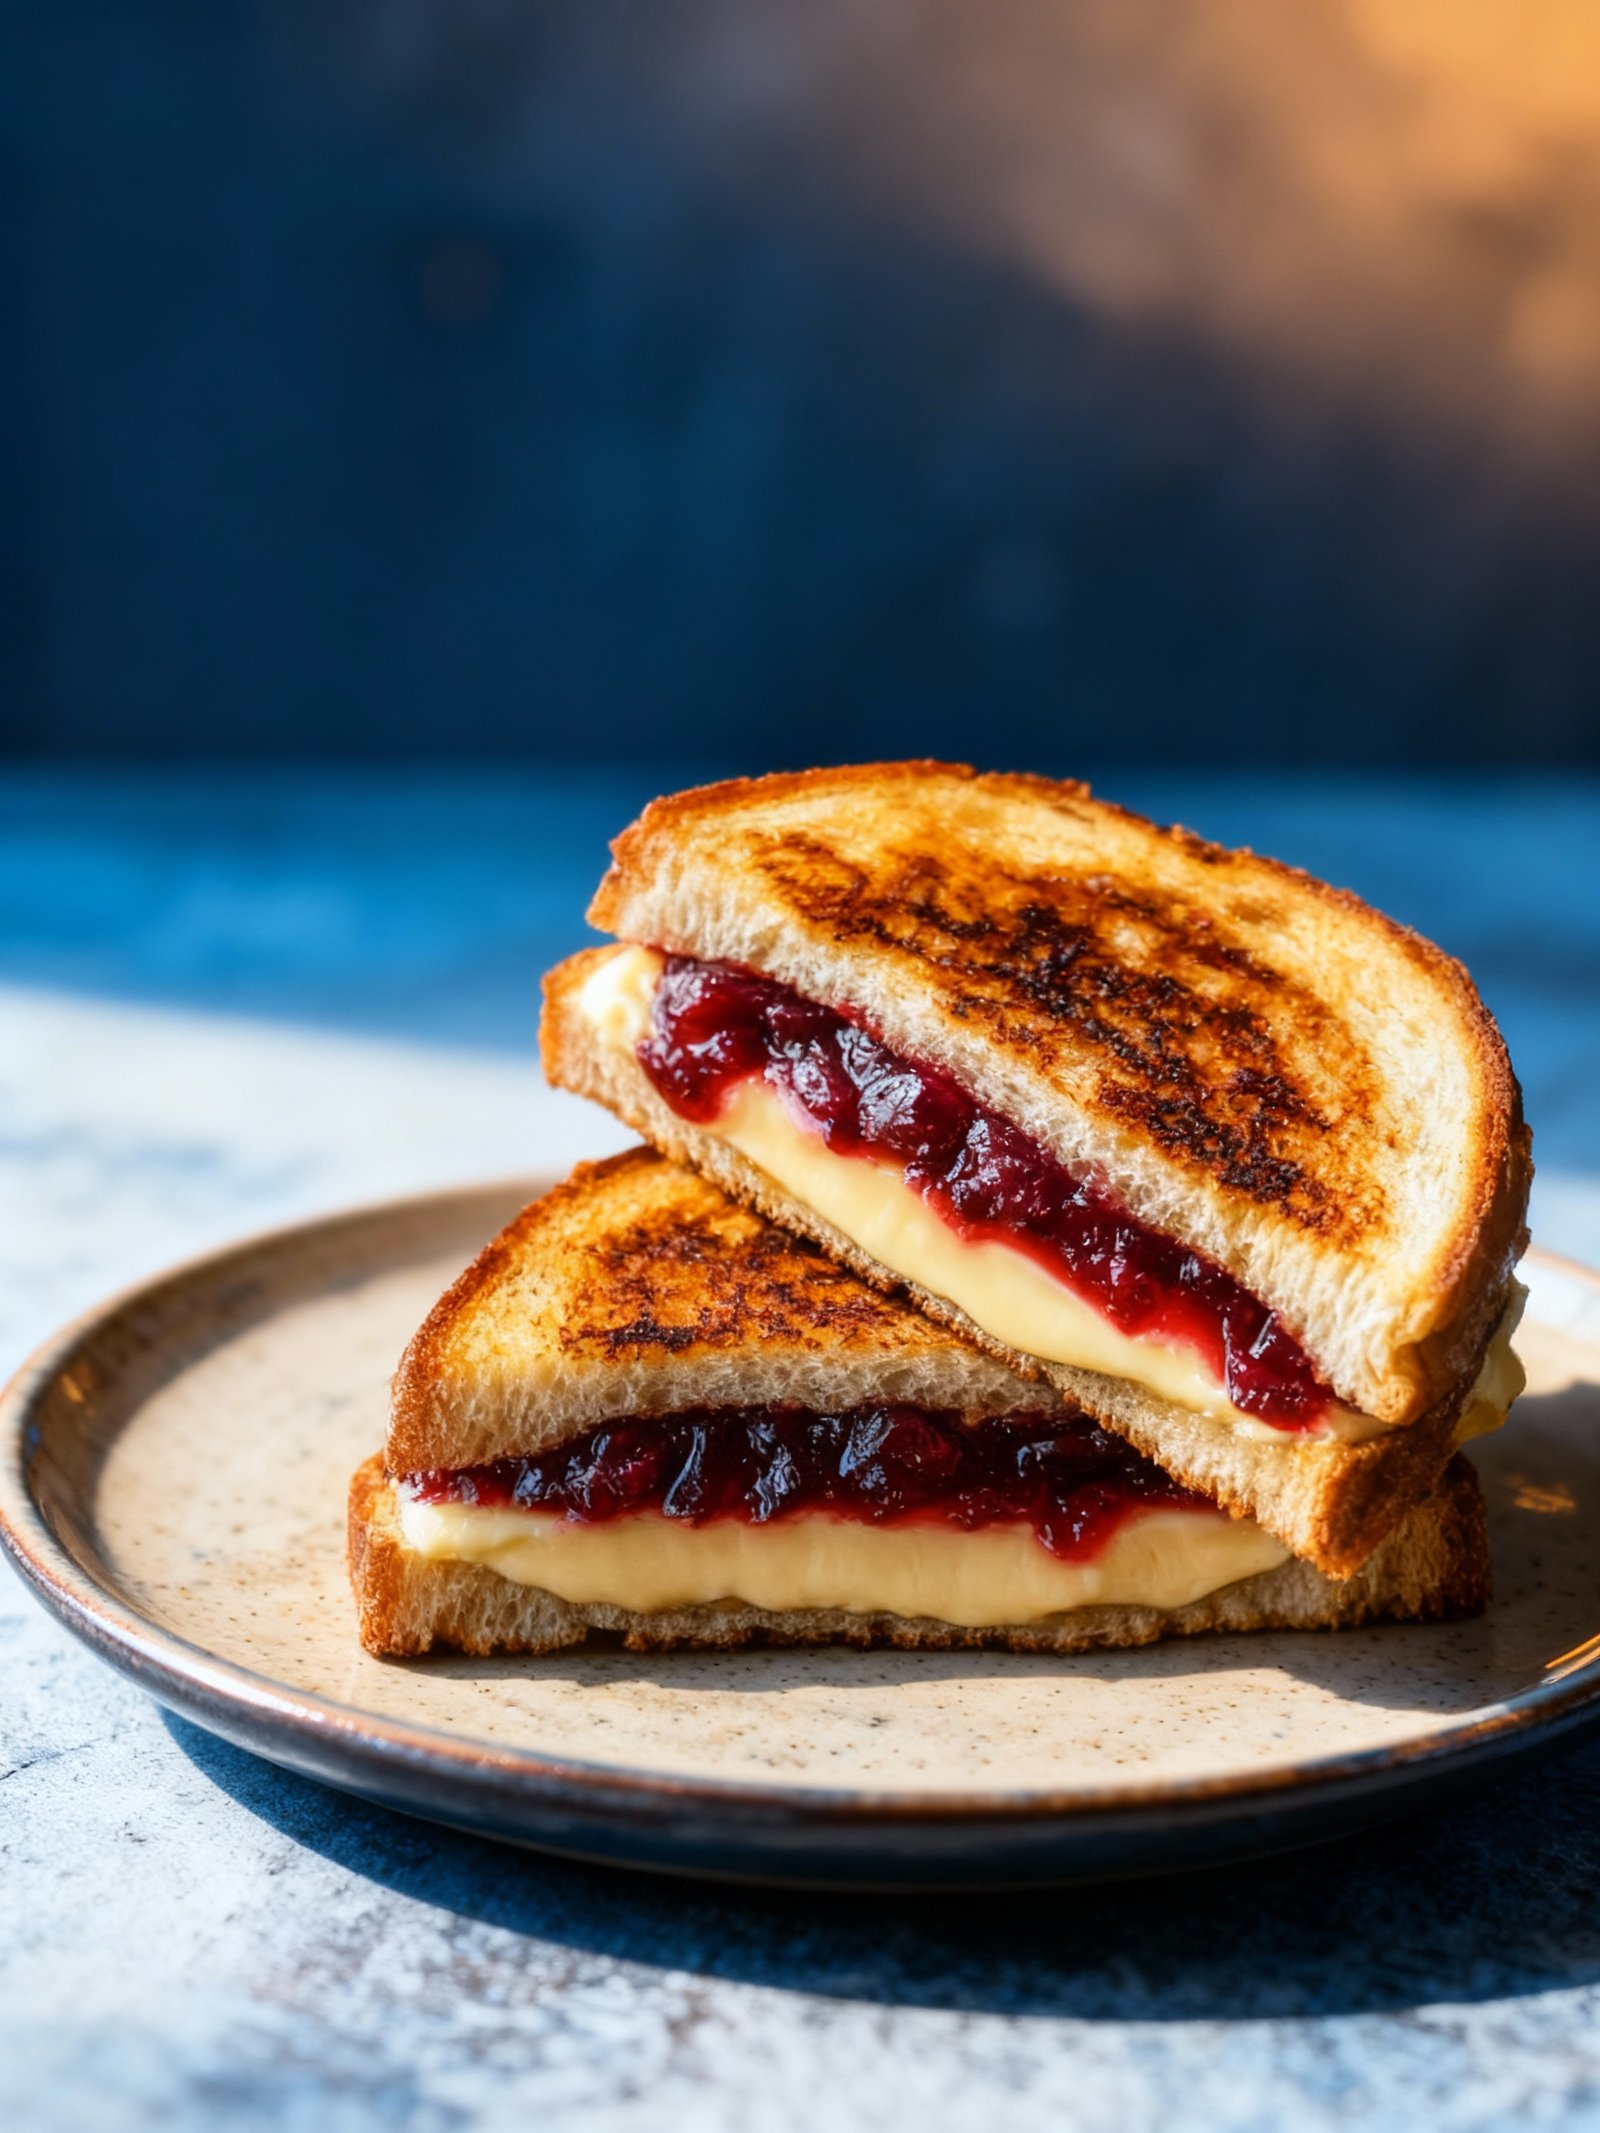
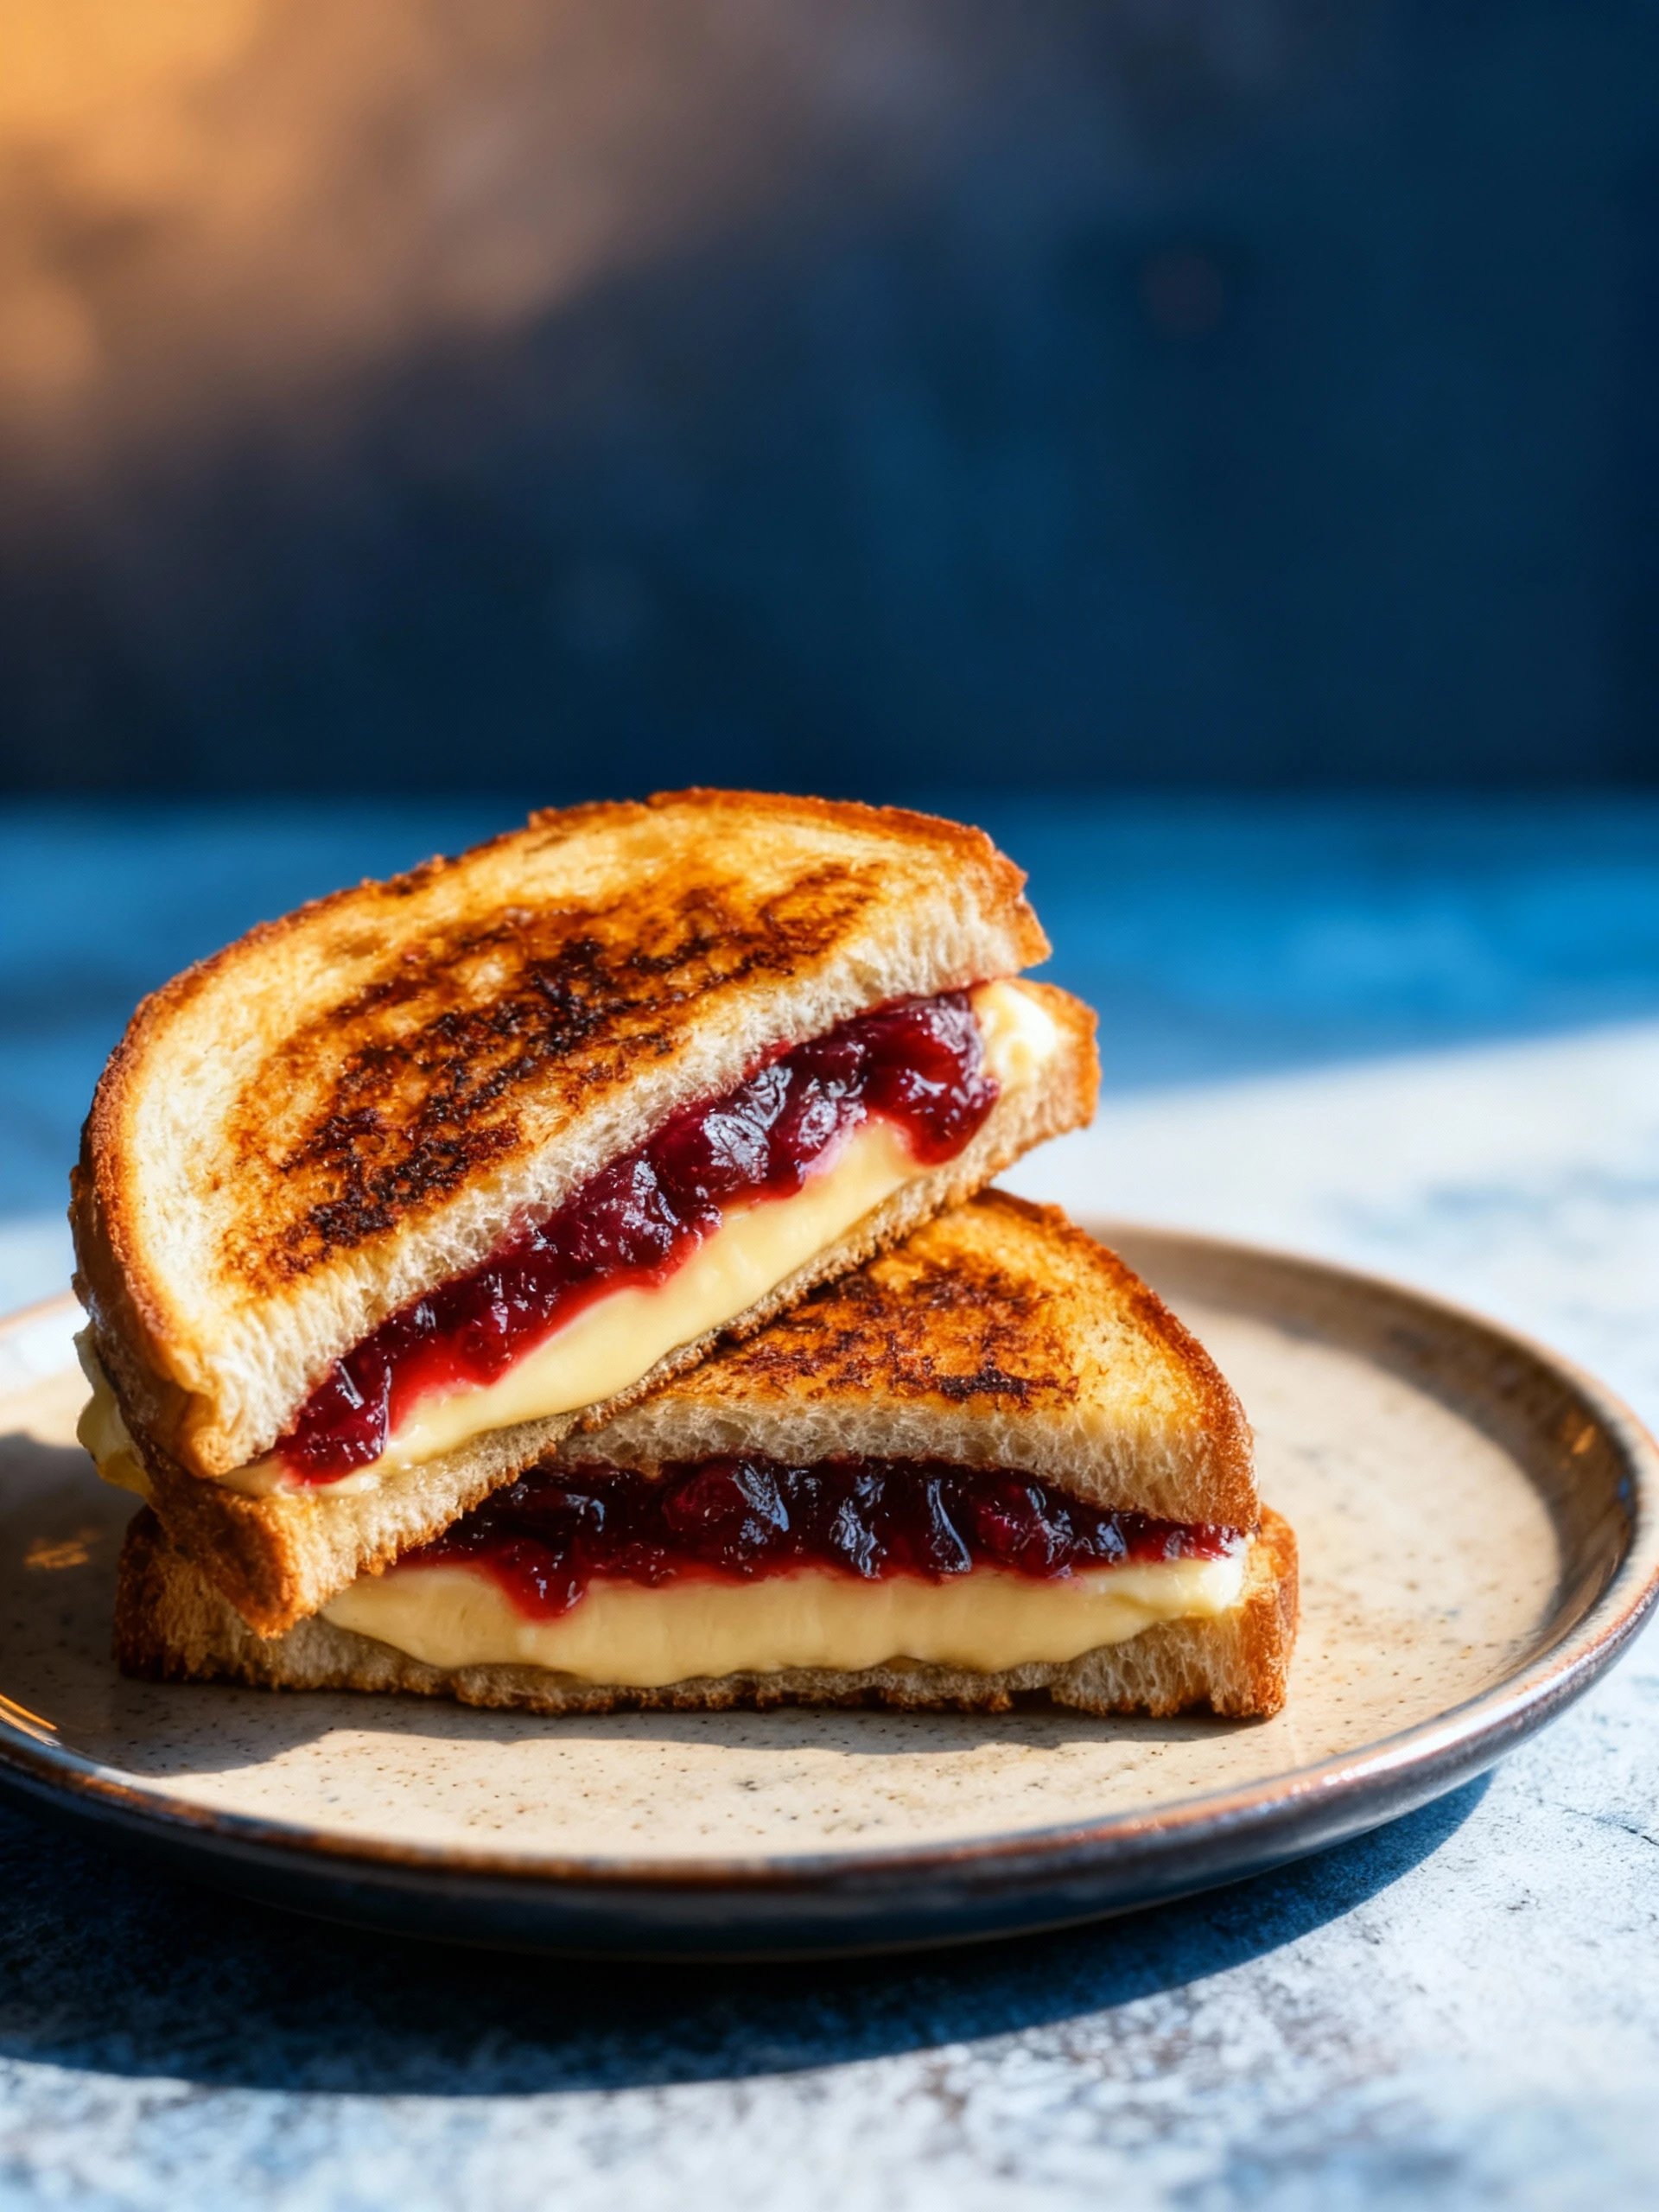
This Cranberry Brie and Mozzarella Grilled Sandwich is a simple yet delicious gourmet lunch option. The combination of creamy brie, melty mozzarella, and sweet-tart cranberry sauce creates a perfect flavor balance. For more cranberry inspiration, try the Cranberry Orange Bread Recipe or these White Chocolate Cranberry Pecan Clusters Recipe.
Ingredients
This grilled cheese combines the tangy sweetness of cranberry with the rich, creamy melt of brie and mozzarella, all hugged by golden, buttery sourdough for the ultimate comfort food experience.
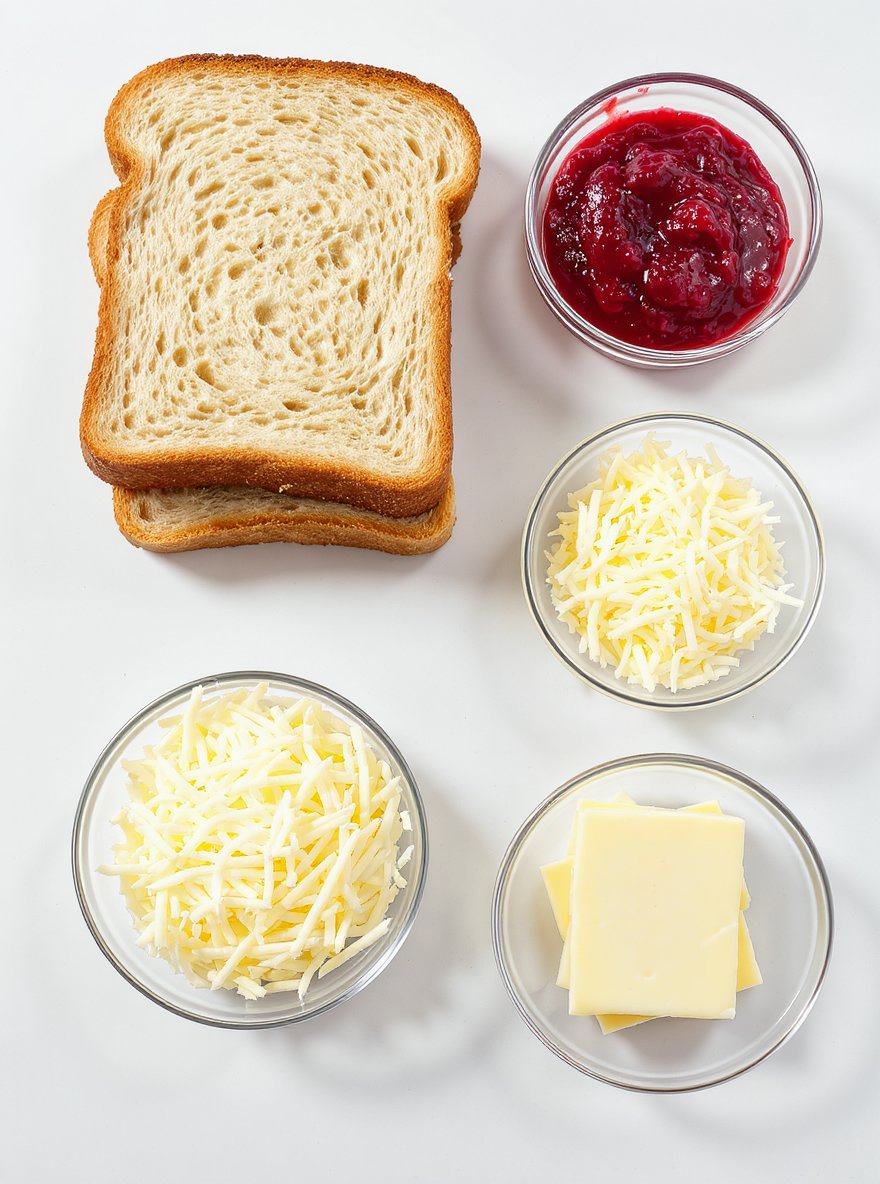
- 8 slices sourdough or crusty bread
- 1/4 cup butter, room temperature
- 1/4 cup cranberry sauce
- 1/2 cup shredded mozzarella cheese
- 4 ounces brie cheese, thinly sliced
Timing
| Prep Time | 10 minutes |
| Cook Time | 25 minutes |
| Total Time | 35 minutes |
Context: This recipe is approximately 20% faster than similar recipes, making it an efficient choice for busy weeknights.
Step-by-Step Instructions
Step 1 — Prepare Your Ingredients
Gather and measure all ingredients before starting. This ensures a smooth cooking process without interruptions.
Chop vegetables, measure spices, and have proteins ready. Proper preparation prevents burning or overcooking while you search for items.
Step 2 — Preheat Your Cooking Surface
Preheat your oven to 375°F or your skillet over medium-high heat. A properly heated surface ensures even cooking from the start.
Test readiness by sprinkling water—if it sizzles immediately, you’re ready to cook. This prevents food from sticking or steaming instead of searing.
Step 3 — Sauté Aromatics
Heat oil in your pan and add onions, garlic, or other aromatics. Cook until fragrant and translucent, about 3–5 minutes.
Stir frequently to prevent burning. Properly cooked aromatics form the flavor foundation of your dish.
Step 4 — Cook Proteins
Add your protein to the hot pan. For poultry, cook until internal temperature reaches 165°F; for beef, 145°F for medium-rare.
Don’t overcrowd the pan—cook in batches if necessary. Overcrowding lowers the temperature and causes steaming instead of browning.
Look for golden-brown coloration and firm texture as visual doneness cues before proceeding.
Step 5 — Incorporate Vegetables and Sauces
Add harder vegetables first, cooking for 2–3 minutes before adding softer ones. This ensures everything cooks evenly.
Pour in sauces or liquids and bring to a simmer. Stir to combine all ingredients thoroughly.
Step 6 — Simmer to Develop Flavors
Reduce heat to low and cover partially. Simmer for 10–15 minutes to allow flavors to meld together.
Taste and adjust seasoning as needed. The sauce should thicken slightly and coat the back of a spoon.
Step 7 — Check Final Doneness
Verify that proteins have reached safe internal temperatures using a meat thermometer.
Vegetables should be tender but still have some bite. Overcooked vegetables become mushy and lose flavor.
Step 8 — Rest Before Serving
Remove from heat and let rest for 5 minutes. This allows juices to redistribute throughout the dish.
Resting improves both texture and flavor absorption in the final presentation.
Step 9 — Plate and Garnish
Serve immediately while hot. Use fresh herbs or a drizzle of oil for final presentation.
Garnish just before serving to maintain freshness and vibrant color contrast on the plate.
Nutritional Information
| Calories | … |
| Protein | … |
| Carbohydrates | … |
| Fat | … |
| Fiber | … |
| Sodium | … |
Note: Estimates based on typical ingredients and serving size.
Healthier Alternatives
- Lean ground turkey or chicken — Lighter protein with savory poultry notes, less saturated fat than beef
- Cauliflower rice or zucchini noodles — Lower-carb vegetable base with mild, fresh flavor
- Coconut milk or cashew cream — Rich, creamy dairy-free substitute with subtle tropical or nutty undertones
- Tamari or coconut aminos — Gluten-free, lower-sodium soy sauce alternatives with umami depth
- Nutritional yeast — Cheesy, savory flavor for dairy-free dishes, packed with B vitamins
- Avocado oil or olive oil — Heart-healthy fats with mild, buttery or fruity notes
- Mashed avocado or Greek yogurt — Creamy texture boost with tangy, rich flavor and added nutrients
Serving Suggestions
- Pair with a crisp green salad and crusty bread for a complete meal.
- Serve alongside roasted vegetables like asparagus or carrots for a hearty dinner.
- Perfect for potlucks and family gatherings, easily doubled for a crowd.
- Garnish with fresh herbs and a drizzle of high-quality olive oil for an elegant touch.
- Plate over creamy polenta or fluffy rice to soak up the delicious sauce.
- Ideal for meal prep, as the flavors deepen when stored in the refrigerator.
For a casual weeknight dinner, serve directly from the skillet at the table. For more formal occasions, transfer to a beautiful serving dish and add a final sprinkle of fresh parsley.
Common Mistakes to Avoid
- Mistake: Overcrowding the pan. Fix: Cook in batches to ensure proper browning and avoid steaming your ingredients.
- Mistake: Not preheating your oven or pan. Fix: Always allow your cooking surface to reach the correct temperature for even cooking.
- Mistake: Substituting ingredients without considering their properties. Fix: Understand the role of each ingredient (e.g., baking powder vs. soda) before making a swap.
- Mistake: Overmixing batters and doughs. Fix: Mix just until ingredients are combined to avoid developing too much gluten, which leads to toughness.
- Mistake: Inaccurate measuring of ingredients. Fix: Use a kitchen scale for precision, especially with baking, as volume measurements can be inconsistent.
- Mistake: Underseasoning food. Fix: Season in layers throughout the cooking process and always taste and adjust before serving.
- Mistake: Slicing meat immediately after cooking. Fix: Let meat rest for a few minutes to allow juices to redistribute, resulting in a more tender and flavorful dish.
- Mistake: Ignoring the importance of mise en place. Fix: Prepare and measure all your ingredients before you start cooking to ensure a smooth, stress-free process.
Storing Tips
- Fridge: Store in an airtight container for up to 3–4 days. Ensure the food cools to room temperature before refrigerating.
- Freezer: Use freezer-safe bags or containers for up to 3 months. Label with the date for easy tracking.
- Reheat: Reheat thoroughly until the internal temperature reaches 165°F (74°C) to ensure food safety. Use a microwave, oven, or stovetop as appropriate.
Always allow leftovers to cool before storing, and divide large portions into smaller containers for quicker cooling and reheating.
Conclusion
This cranberry brie and mozzarella grilled sandwich is a perfect blend of sweet and savory. For more festive sides, try our Herbed Wild Rice with Pomegranate. Give this recipe a try and share your thoughts in the comments!
PrintCranberry Brie and Mozzarella Grilled Cheese Sandwich

A delicious grilled cheese sandwich featuring the tangy sweetness of cranberry sauce, creamy brie, and melty mozzarella cheese on hearty bread.
- Prep Time: 10 minutes
- Cook Time: 10 minutes
- Total Time: 20 minutes
- Yield: 4 1x
- Method: Main Course
- Cuisine: American
Ingredients
- 8 slices sourdough or crusty bread
- 1/4 cup butter, room temperature
- 1/4 cup cranberry sauce
- 1/2 cup shredded mozzarella cheese
- 4 ounces brie cheese, thinly sliced
Instructions
- Generously butter one side of each slice of bread.
- Flip half the slices over and spread their opposite sides with cranberry sauce.
- Place brie and mozzarella cheese on top of the cranberry sauce, add a pinch of flaky salt if desired, then top each sandwich with a remaining bread slice (butter side up).
- Cook sandwiches in a large skillet over medium heat until the bread is golden brown and the cheese is melted, about 3-4 minutes per side.
- Remove from skillet, cut in half, and serve immediately.
Notes
For best results, use cold brie as it’s easier to slice thinly. This sandwich pairs well with creamy soups or a quick side salad.
Nutrition
- Calories: 380
- Sugar: 8
- Sodium: 600
- Fat: 25
- Saturated Fat: 14
- Unsaturated Fat: 8
- Trans Fat: 0
- Carbohydrates: 30
- Fiber: 2
- Protein: 15
- Cholesterol: 60
FAQs
Can I make this recipe ahead of time?
Yes, this recipe is great for making ahead. Prepare it up to the final step, then cover and refrigerate. Bake just before serving for the best texture.
What can I substitute if I don’t have a key ingredient?
You can often substitute similar ingredients based on what you have available. For best results, choose a substitute that matches the original ingredient’s role in the recipe.
How do I store leftovers of this recipe?
Store any leftovers in an airtight container in the refrigerator. Reheat gently to maintain the dish’s quality and flavor.


