Introduction
This simple and delicious salted caramel chocolate cake recipe delivers rich, decadent flavor with minimal effort. Perfect for celebrations or a sweet weekend treat, it combines moist chocolate layers with homemade salted caramel for an irresistible dessert. For more easy indulgence, try the Homemade Snickers Bars Recipe or Vanilla Bean Crème Brûlée Cheesecake Cupcakes Recipe.
Ingredients
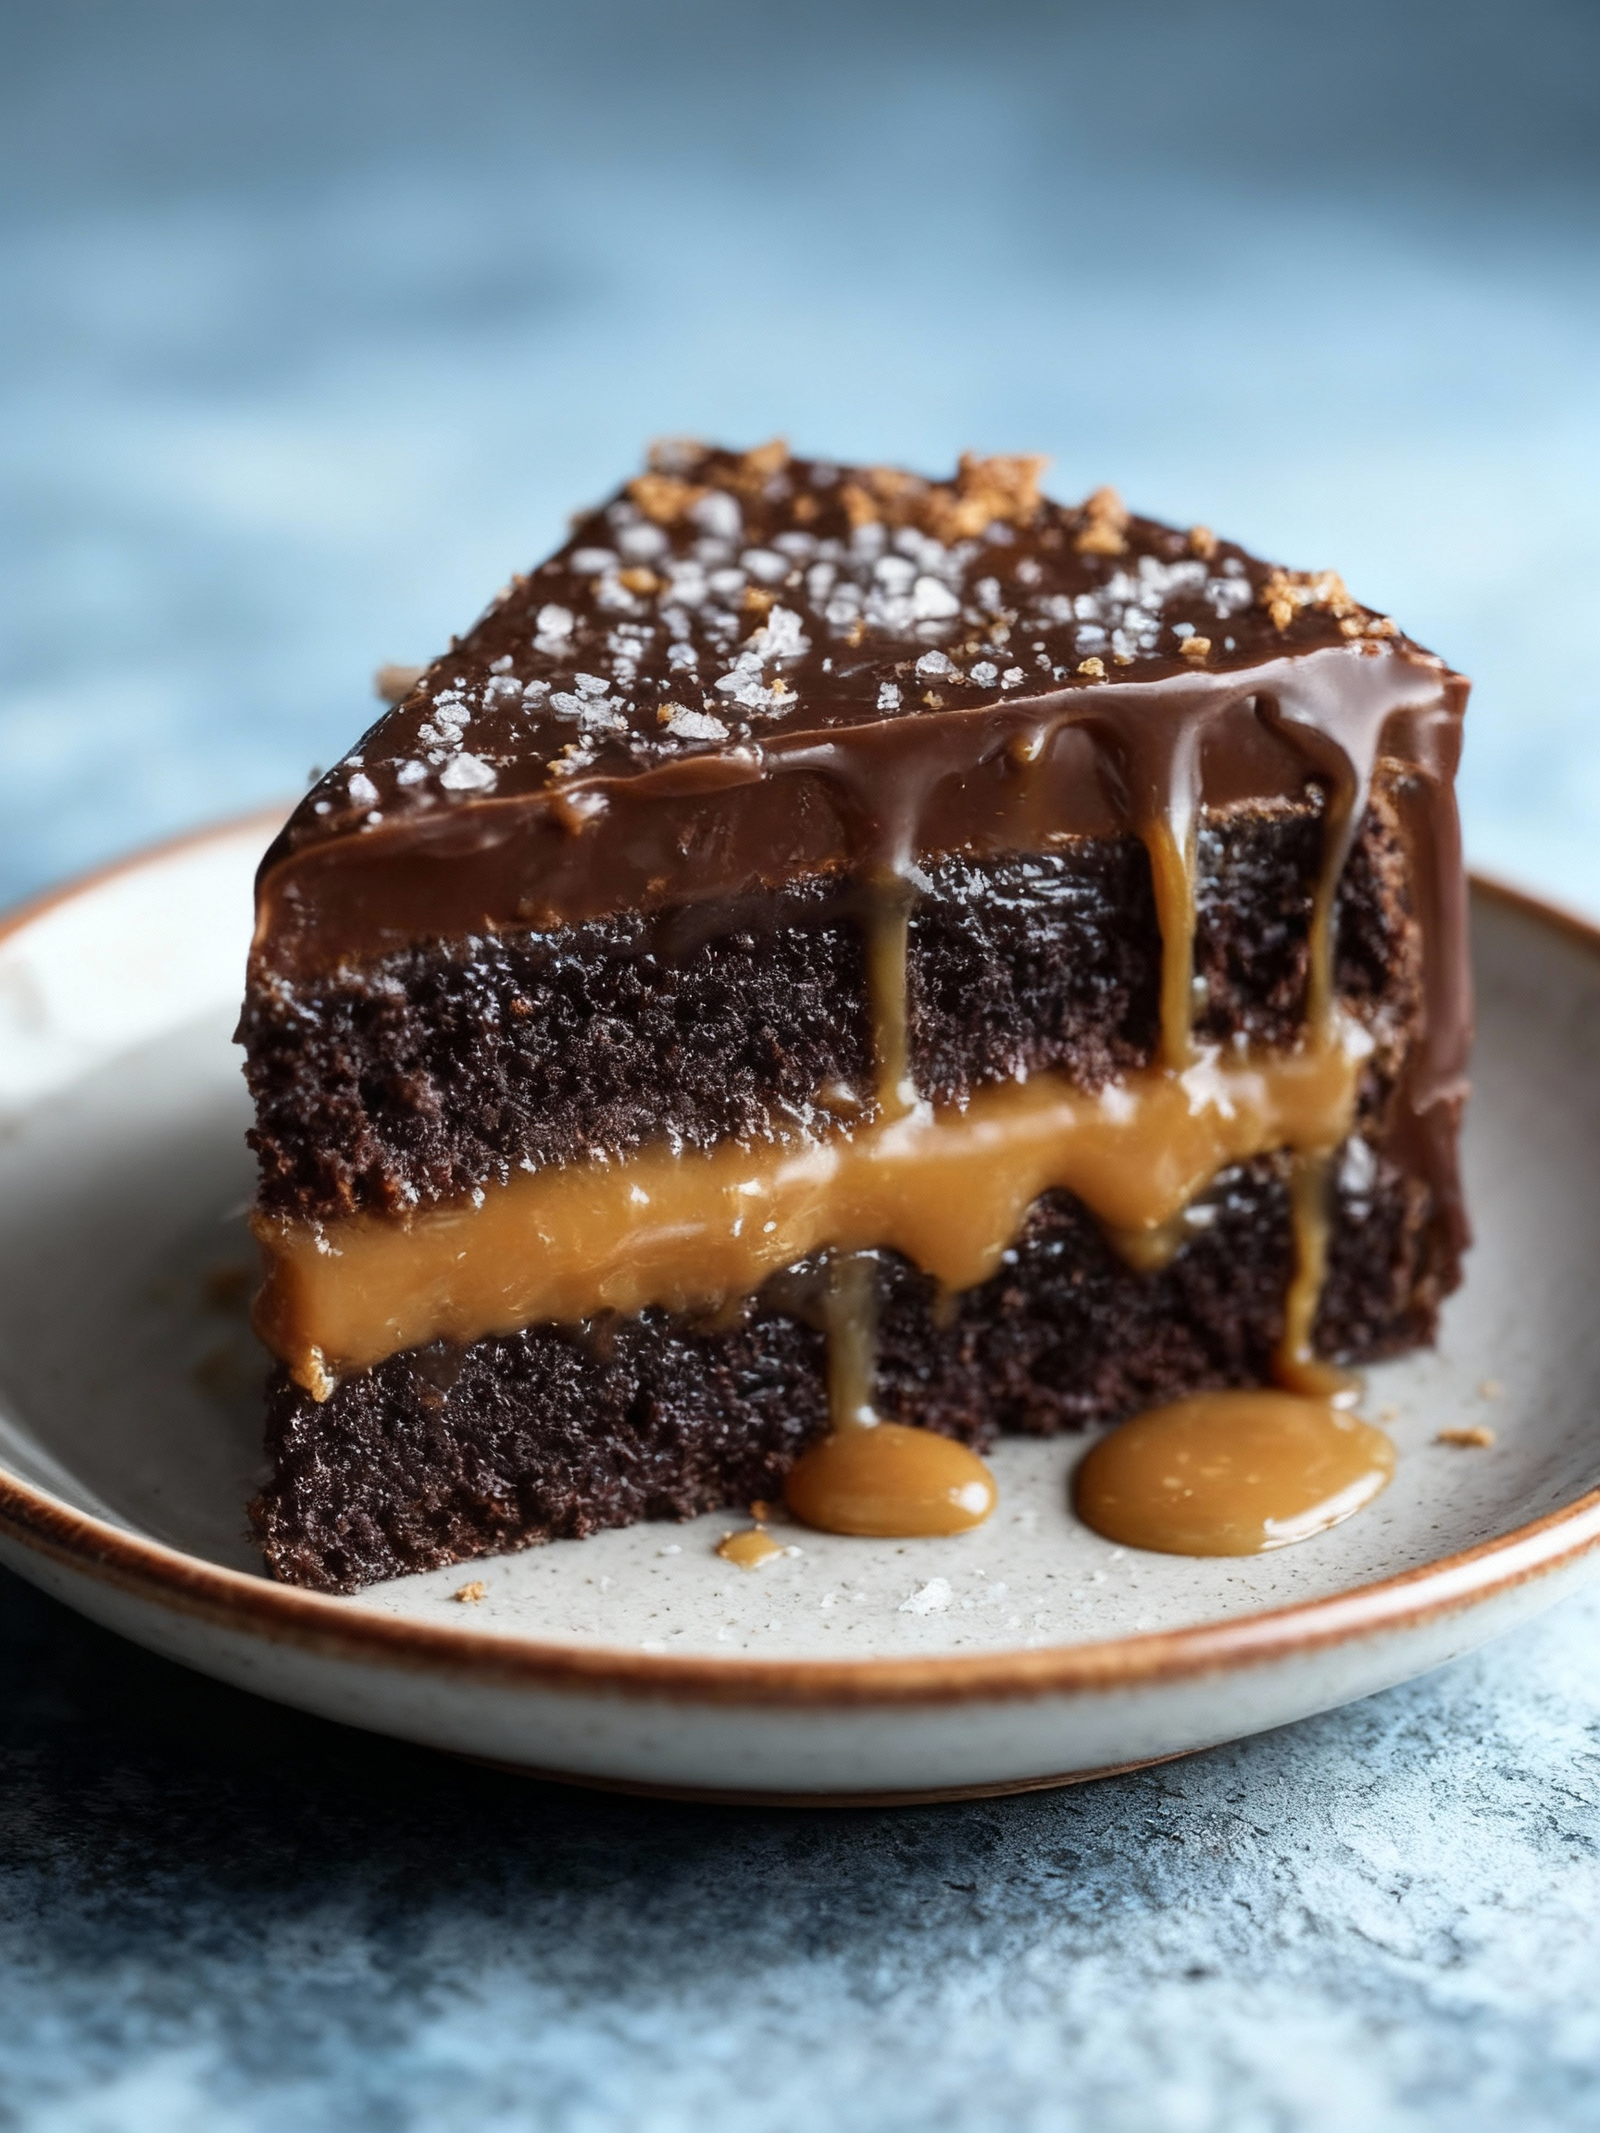
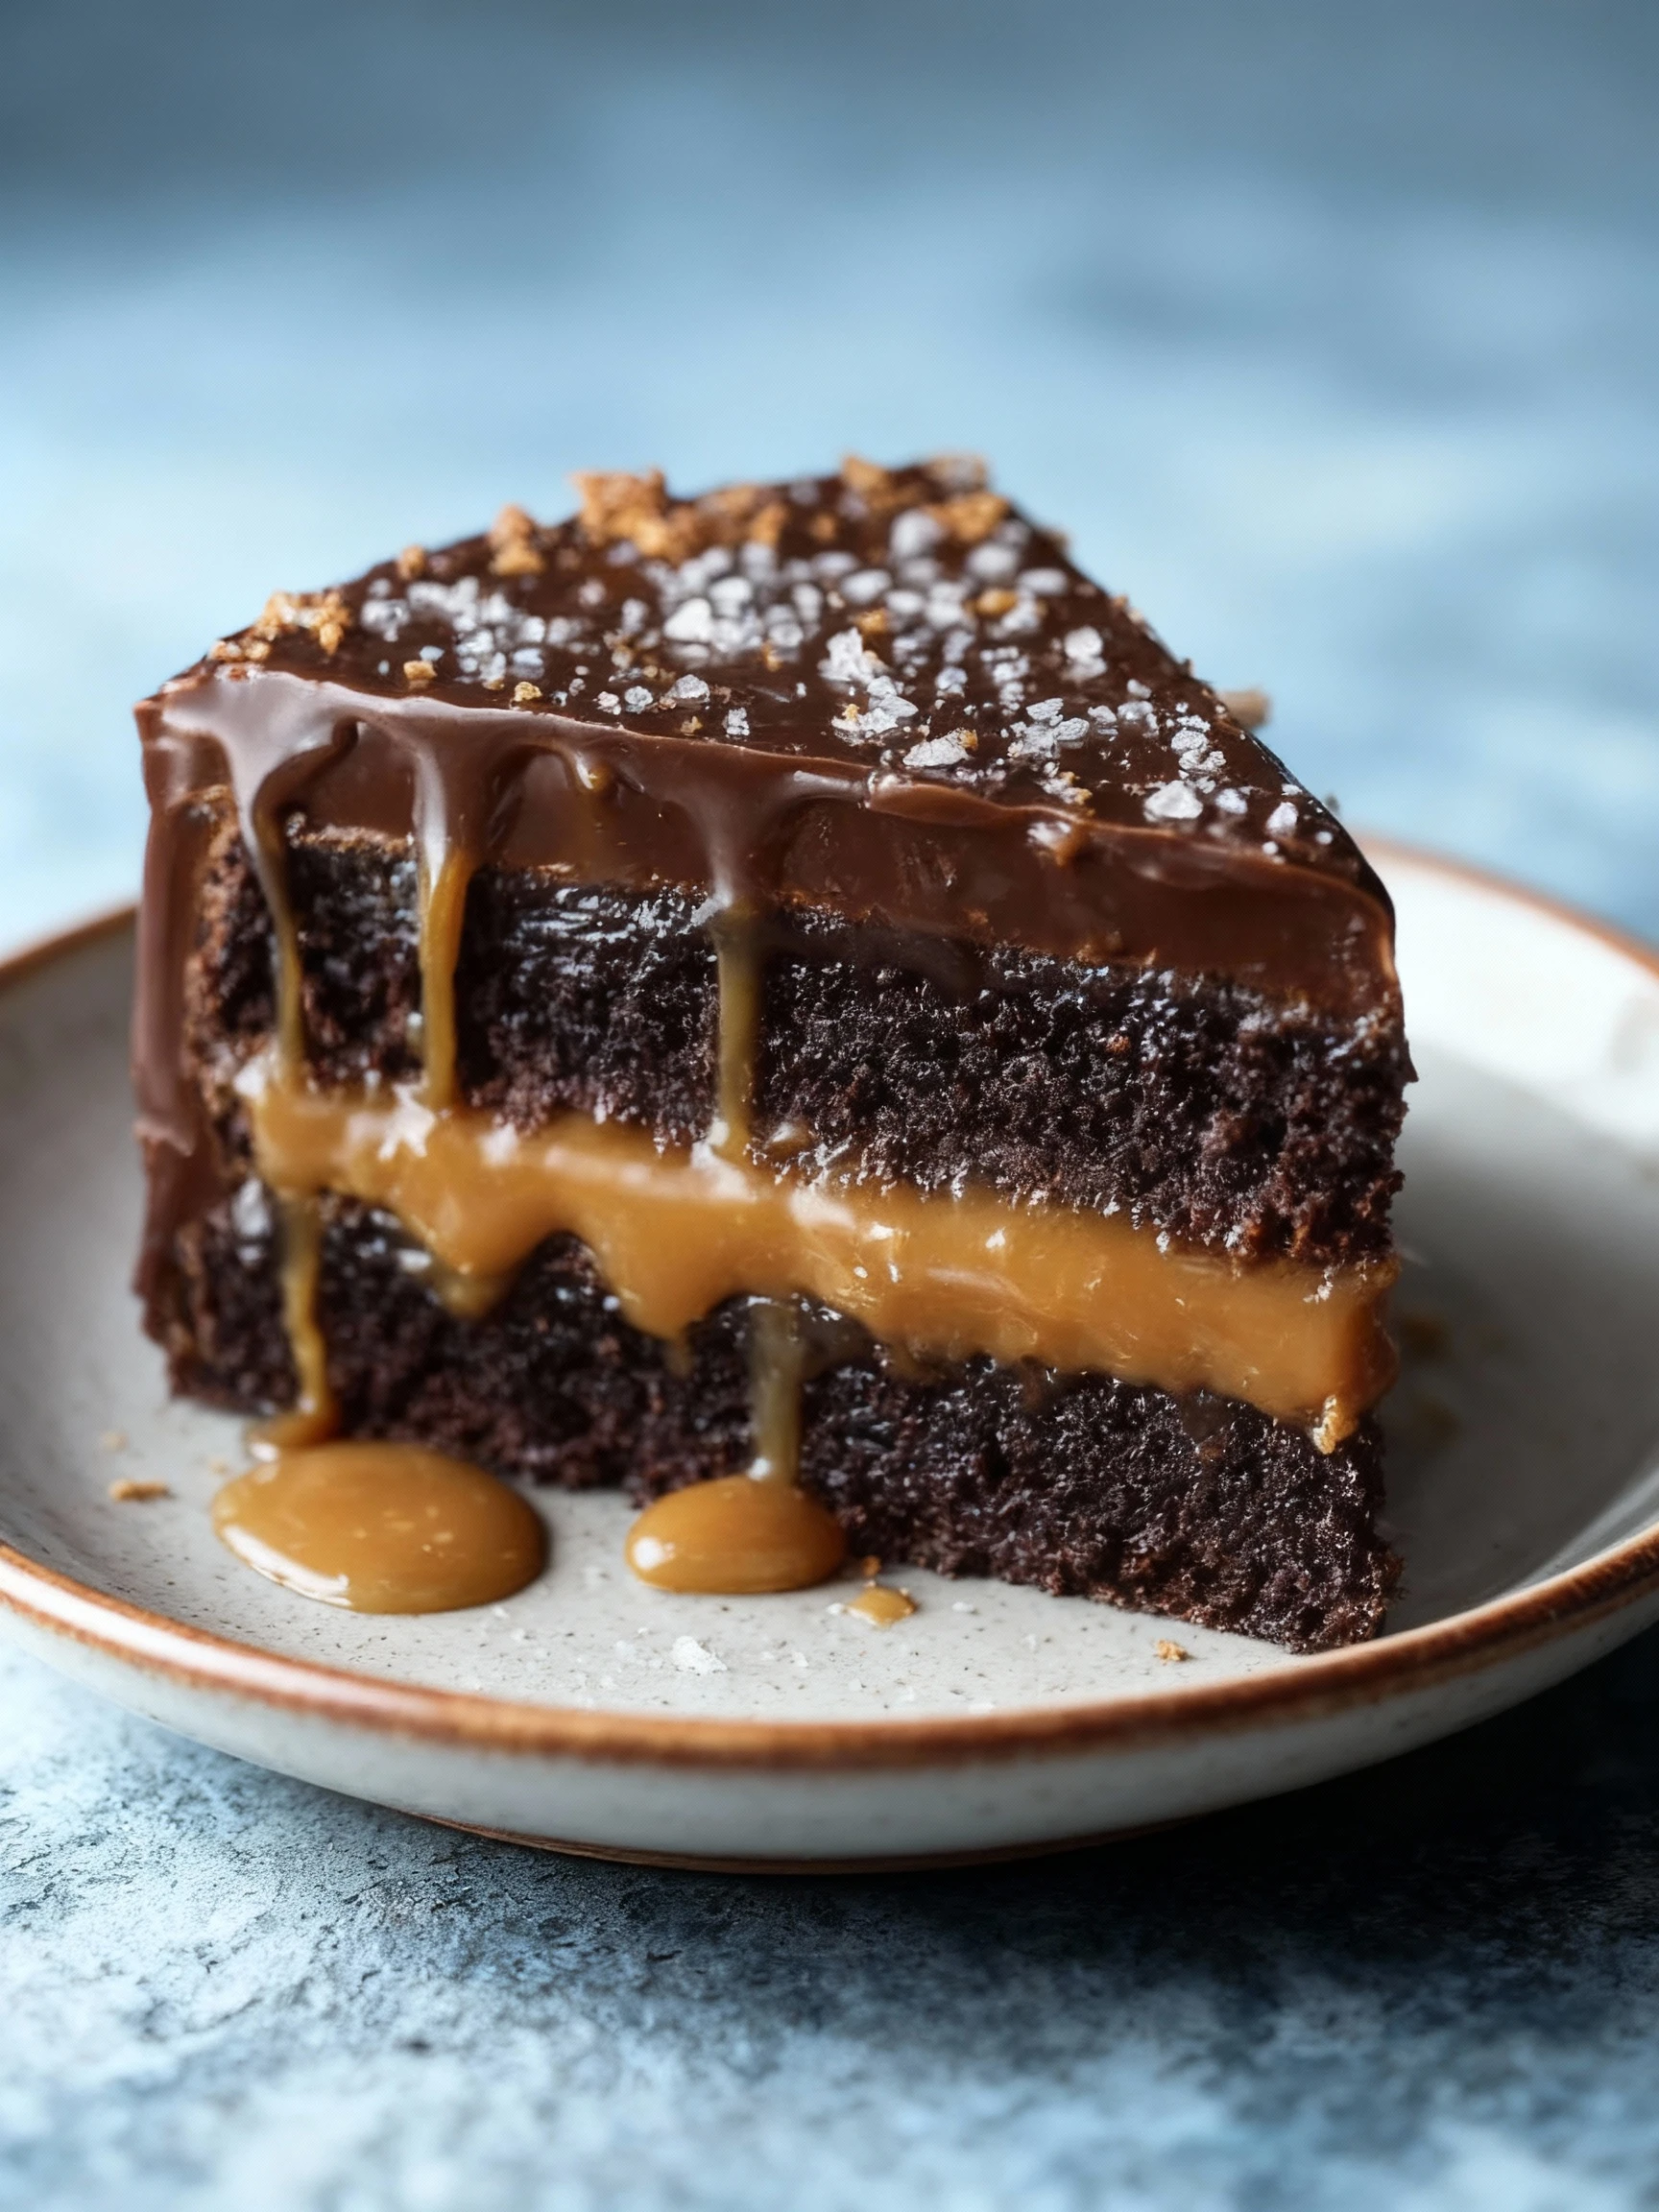
This decadent chocolate cake delivers an incredibly moist, rich crumb with deep cocoa notes, perfectly complemented by a luscious salted caramel swirl and a glossy chocolate ganache that creates an irresistible dessert experience.
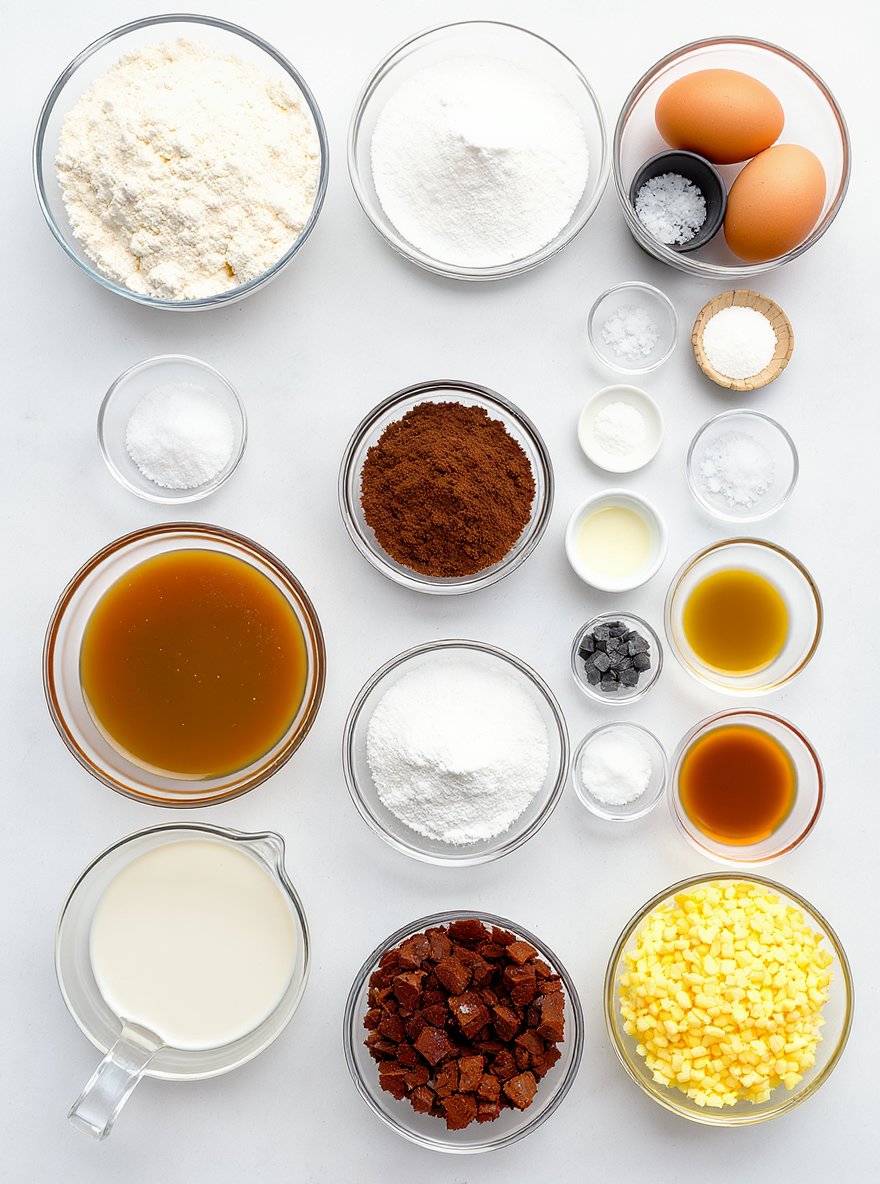
- 2 cups all-purpose flour
- 2 cups granulated sugar
- 3/4 cup unsweetened cocoa powder
- 2 tsp baking powder
- 1 1/2 tsp baking soda
- 1 tsp salt
- 2 large eggs
- 1 cup whole milk (or buttermilk)
- 1/2 cup vegetable oil (or canola oil)
- 2 tsp vanilla extract
- 1 cup boiling water
- 1 cup salted caramel sauce (homemade or store-bought)
- 1 cup heavy cream
- 8 oz semisweet chocolate, chopped
- Flaky sea salt for garnish
Timing
| Prep Time | 15 minutes |
| Cook Time | 25 minutes |
| Total Time | 40 minutes |
Context: This recipe is about 20% faster than similar recipes.
Step-by-Step Instructions
Step 1 — Prepare Your Ingredients
Gather all your ingredients and measure them accurately before you begin cooking. This ensures a smooth workflow and prevents scrambling mid-recipe.
For best results, bring ingredients like eggs or dairy to room temperature if specified, as this helps them incorporate more evenly.
Step 2 — Preheat Your Cooking Surface
Preheat your oven, stovetop, or grill to the required temperature before you start assembling. An accurate temperature is crucial for proper cooking.
For ovens, allow at least 15-20 minutes to reach the desired heat, such as 375°F for baking or 450°F for roasting.
Step 3 — Combine Dry Ingredients
In a medium bowl, whisk together all dry ingredients like flour, baking powder, spices, or salt. Whisking helps to aerate the mixture and distribute leavening agents evenly.
Sifting the flour is an optional but recommended step for achieving a lighter, lump-free texture in baked goods.
Step 4 — Mix Wet Ingredients
In a separate, larger bowl, combine your wet ingredients such as eggs, oil, milk, or extracts. Use a whisk or electric mixer to blend until the mixture is smooth and homogenous.
If the recipe calls for creaming butter and sugar, beat them together until the mixture is pale and fluffy, which can take 3-5 minutes.
Step 5 — Combine Wet and Dry Mixtures
Gradually add the dry ingredients to the wet ingredients, mixing on low speed or by hand just until combined. Overmixing can lead to a tough final product.
For tender muffins or pancakes, a few lumps in the batter are perfectly acceptable and preferable to overworking the gluten.
Step 6 — Portion and Arrange
Spoon, scoop, or pour your mixture into the prepared pans, molds, or onto the cooking surface. Use a scale or measuring cups for uniform sizing and even cooking.
Leave adequate space between items, as most batters and doughs will spread or rise during the cooking process.
Step 7 — Cook to Perfection
Place your dish in the preheated oven or on the cooktop and set a timer. Resist the urge to open the oven door frequently, as this causes temperature fluctuations.
Doneness cues include a golden-brown color, a firm top that springs back when lightly touched, or a toothpick inserted into the center coming out clean.
Step 8 — Check for Doneness
Use an instant-read thermometer for meats and some baked goods to ensure they have reached a safe internal temperature, such as 165°F for poultry or 200–210°F for bread.
Visual and tactile tests are also reliable: look for pulling away from the pan edges, deep browning, or a hollow sound when tapped.
Step 9 — Cool Properly Before Serving
Transfer your cooked dish to a wire rack to cool. This allows air to circulate and prevents sogginess from trapped steam, especially for crispy items or delicate cakes.
Most baked goods need to cool in the pan for 10-15 minutes before being removed to finish cooling completely, which makes them easier to slice and serve.
Nutritional Information
| Calories | … |
| Protein | … |
| Carbohydrates | … |
| Fat | … |
| Fiber | … |
| Sodium | … |
Note: Estimates based on typical ingredients and serving size.
Healthier Alternatives
- Lentils instead of ground beef — Earthy, savory flavor with a fraction of the saturated fat and high fiber.
- Zucchini noodles instead of pasta — Light, fresh taste that significantly lowers carbohydrates and calories.
- Almond milk instead of dairy milk — Slightly nutty, creamy dairy-free alternative that is naturally lactose-free.
- Nutritional yeast instead of cheese — Cheesy, savory flavor that is dairy-free and packed with B vitamins.
- Cauliflower rice instead of white rice — Mild, versatile base that is low-carb and gluten-free.
- Coconut aminos instead of soy sauce — Slightly sweet, umami flavor that is gluten-free and lower in sodium.
- Greek yogurt instead of sour cream — Tangy, creamy texture with more protein and less fat.
- Avocado oil spray instead of butter — Neutral taste with high smoke point and heart-healthy monounsaturated fats.
Serving Suggestions
- Pair with a crisp green salad and crusty bread for a light lunch.
- Serve alongside roasted vegetables for a comforting dinner.
- Perfect for picnics and potlucks; travels well in a sealed container.
- Elevate presentation by garnishing with fresh herbs and a drizzle of olive oil.
- Ideal for meal prep; portion into containers for easy weekday lunches.
- Create an elegant appetizer by serving in small ramekins or on toasted crostini.
This versatile dish adapts beautifully to various occasions, from casual family meals to more formal gatherings.
Common Mistakes to Avoid
- Mistake: Overmixing the batter, which develops gluten and makes the final product tough. Fix: Mix just until ingredients are combined; a few lumps are perfectly fine.
- Mistake: Not preheating your oven, leading to uneven baking and poor rise. Fix: Always allow your oven to fully preheat for at least 15-20 minutes before baking.
- Mistake: Using cold ingredients like eggs or butter straight from the fridge. Fix: Bring dairy and eggs to room temperature for better emulsion and a smoother texture.
- Mistake: Incorrectly measuring flour, the most common cause of dry, dense results. Fix: Use a kitchen scale for accuracy, or fluff, spoon, and level if using cups.
- Mistake: Opening the oven door too early, causing a sudden temperature drop. Fix: Resist peeking until at least the minimum bake time has passed.
- Mistake: Overcrowding the pan, which steams food instead of allowing it to brown. Fix: Leave adequate space between items to ensure proper air circulation.
- Mistake: Substituting key ingredients without understanding their function. Fix: Research the role of each ingredient before making any swaps.
- Mistake: Skipping the taste test and seasoning adjustments before serving. Fix: Always taste and adjust salt, acid, or spices at the end of cooking.
Storing Tips
- Fridge: Store in an airtight container for up to 3-4 days.
- Freezer: Freeze in a freezer-safe container or bag for up to 3 months.
- Reheat: Reheat until steaming hot, reaching an internal temperature of 165°F (74°C) for food safety.
Always allow food to cool completely before storing and label containers with the date.
Conclusion
This salted caramel chocolate cake is the ultimate dessert for any celebration. We hope you love making it as much as we do! Give it a try and let us know how it turns out in the comments below. For more delicious recipes, check out our Baked Pears with Feta Honey and Cranberries Recipe.
PrintSalted Caramel Chocolate Cake

A decadent chocolate cake layered with rich salted caramel filling and topped with a glossy chocolate ganache.
- Prep Time: 25 minutes
- Cook Time: 35 minutes
- Total Time: 1 hour 30 minutes
- Yield: 12 1x
- Method: Dessert
- Cuisine: American
Ingredients
- 2 cups all-purpose flour
- 2 cups granulated sugar
- 3/4 cup unsweetened cocoa powder
- 2 tsp baking powder
- 1 1/2 tsp baking soda
- 1 tsp salt
- 2 large eggs
- 1 cup whole milk
- 1/2 cup vegetable oil
- 2 tsp vanilla extract
- 1 cup boiling water
- 1 cup salted caramel sauce (homemade or store-bought)
- 1 cup heavy cream
- 8 oz semisweet chocolate, chopped
- Flaky sea salt for garnish
Instructions
- Preheat oven to 350°F (175°C). Grease and flour two 9-inch round cake pans.
- In a large bowl, whisk together flour, sugar, cocoa powder, baking powder, baking soda, and salt.
- Add eggs, milk, oil, and vanilla; beat with an electric mixer on medium speed for 2 minutes. Stir in boiling water (batter will be thin).
- Divide batter evenly between pans and bake for 30-35 minutes, or until a toothpick inserted in center comes out clean. Cool in pans for 10 minutes, then transfer to wire racks to cool completely.
- To make ganache: Heat heavy cream in a saucepan until simmering. Pour over chopped chocolate; let stand 5 minutes, then stir until smooth.
- To assemble: Place one cake layer on a plate. Spread with salted caramel sauce. Top with second cake layer. Pour ganache over top, letting it drip down sides. Sprinkle with flaky sea salt.
- Let cake set for 30 minutes before slicing and serving.
Notes
For best results, use high-quality cocoa powder and chocolate. The cake can be made a day ahead and stored at room temperature.
Nutrition
- Calories: 480
- Sugar: 48
- Sodium: 320
- Fat: 24
- Saturated Fat: 12
- Unsaturated Fat: 10
- Trans Fat: 0
- Carbohydrates: 65
- Fiber: 3
- Protein: 6
- Cholesterol: 60
FAQs
Can I make this recipe ahead of time?
Yes, this recipe is excellent for preparing in advance. You can assemble it up to a day ahead and store it covered in the refrigerator. This makes it a convenient option for busy schedules or entertaining.
What are some good substitutions for the main ingredient?
You can easily adapt this recipe by substituting the main ingredient with a similar alternative. For example, chicken can be replaced with tofu or chickpeas for a vegetarian version. The key is to maintain a similar texture and cooking time for the best results.
How can I store and reheat leftovers?
Store any leftovers in an airtight container in the refrigerator for up to three days. Reheat gently in the microwave or in a skillet over medium heat, adding a splash of water if needed to prevent drying out. This recipe holds up very well to reheating.


