Introduction
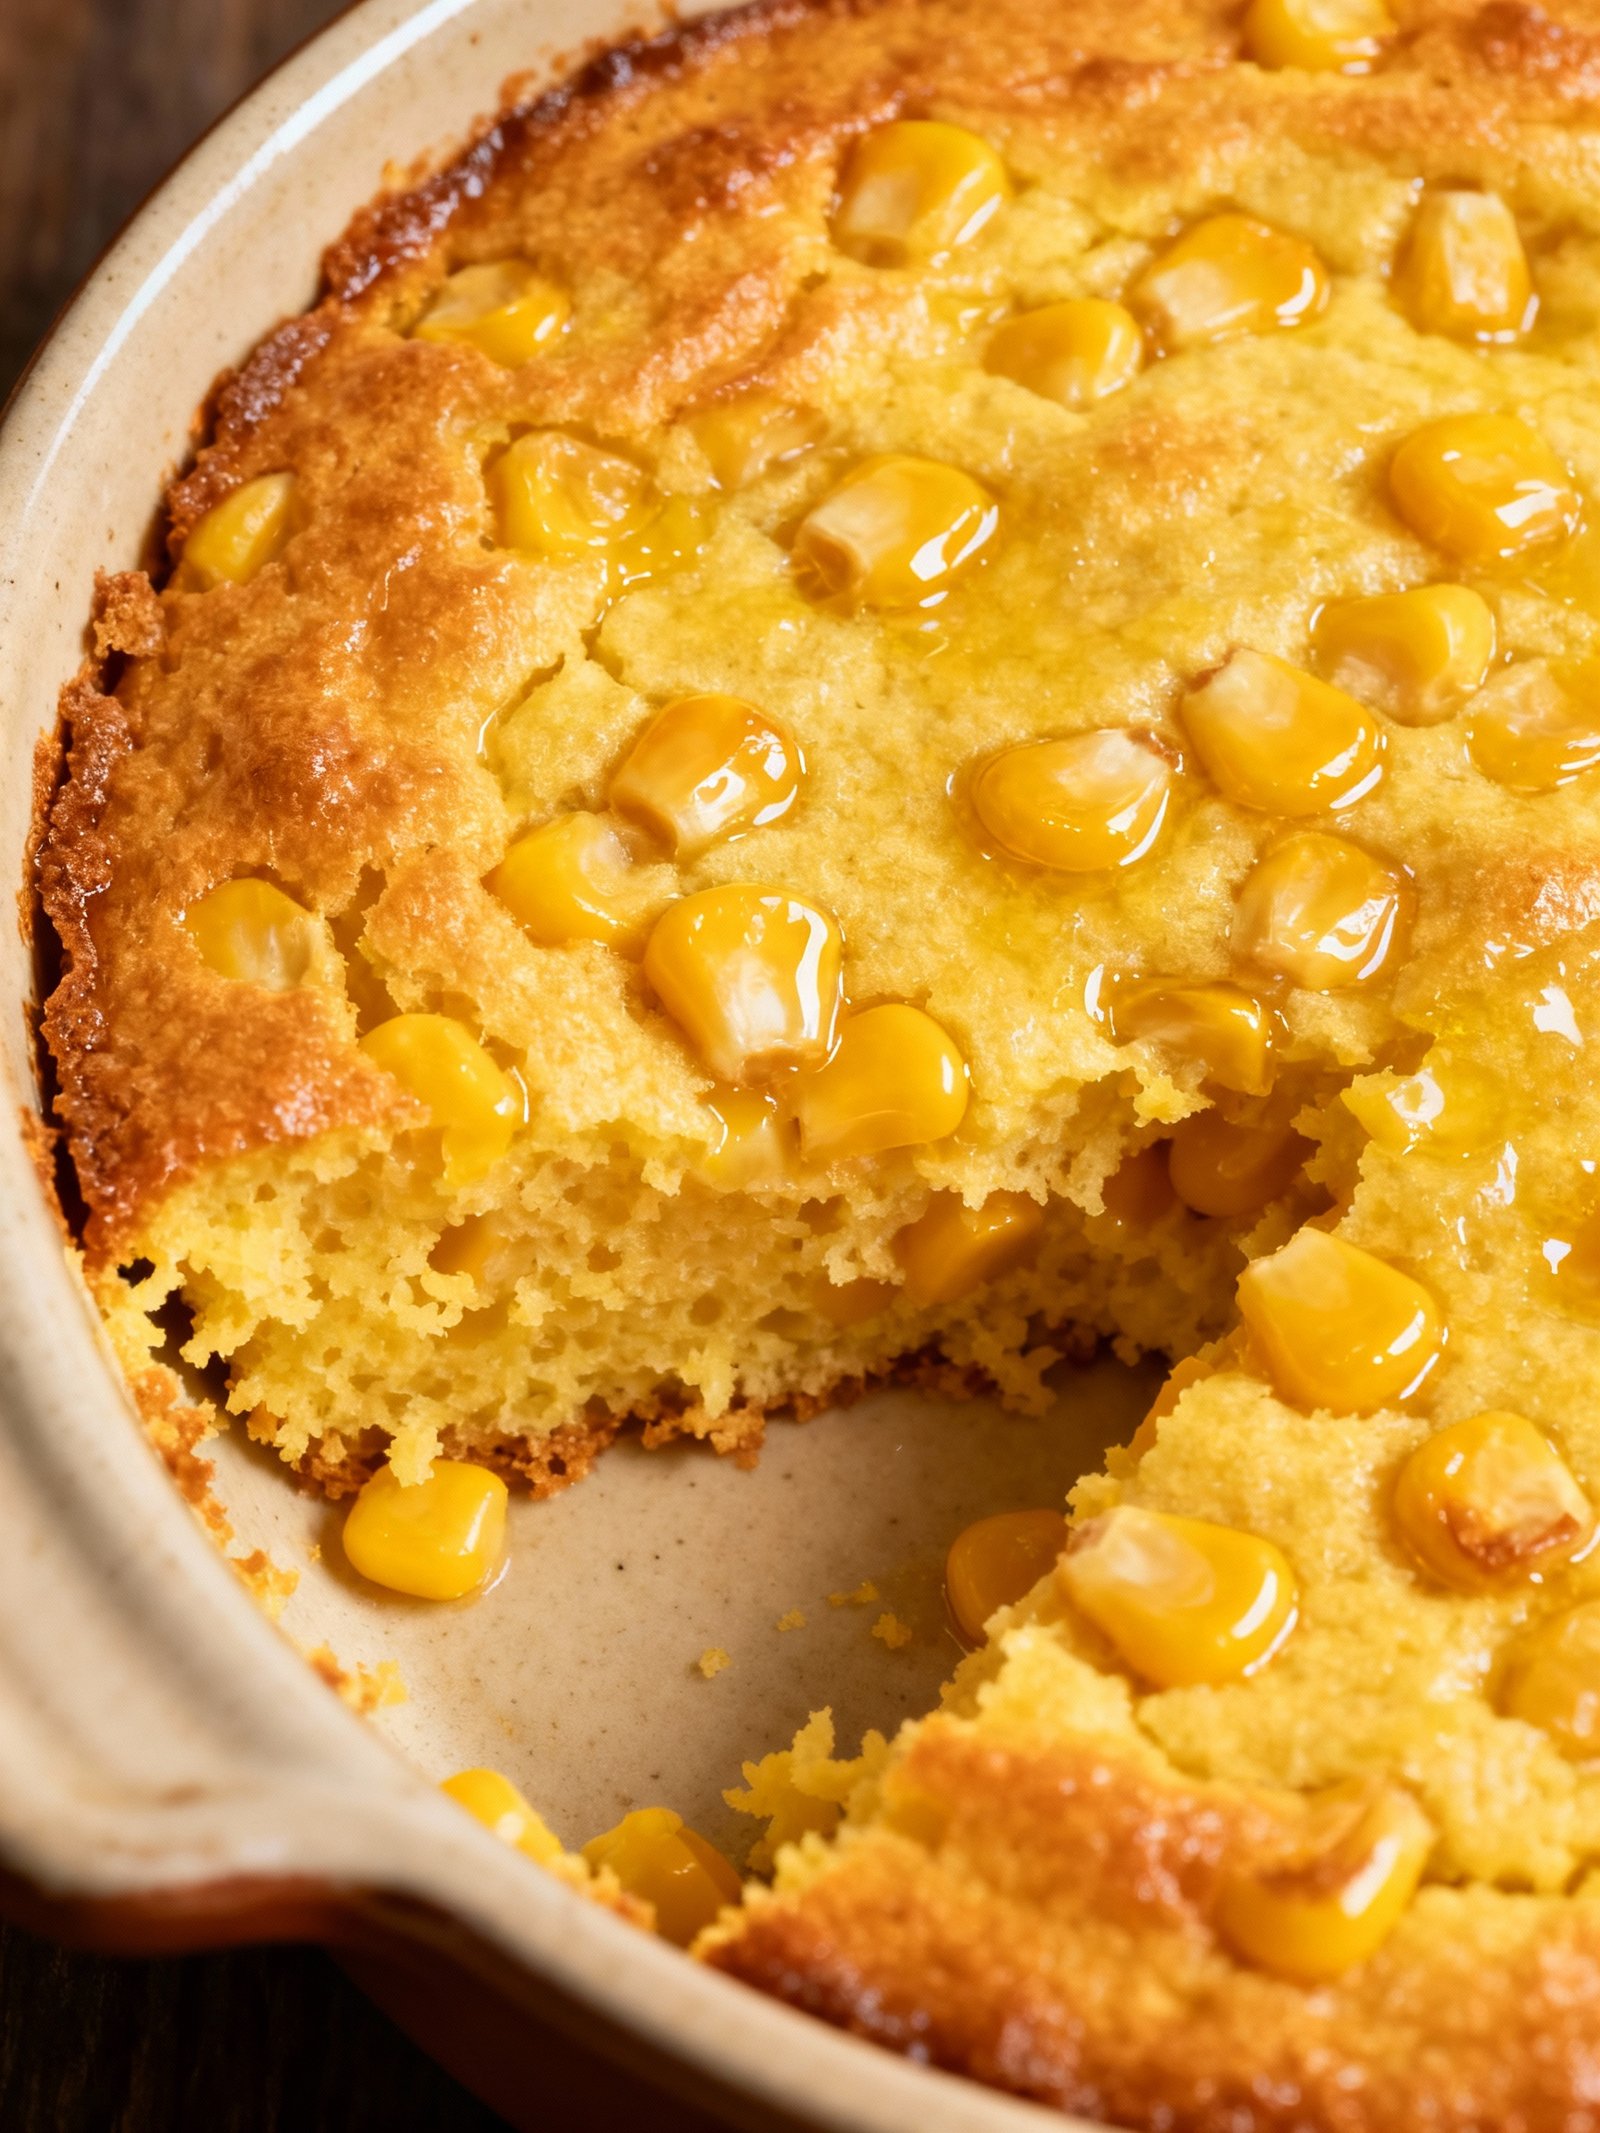
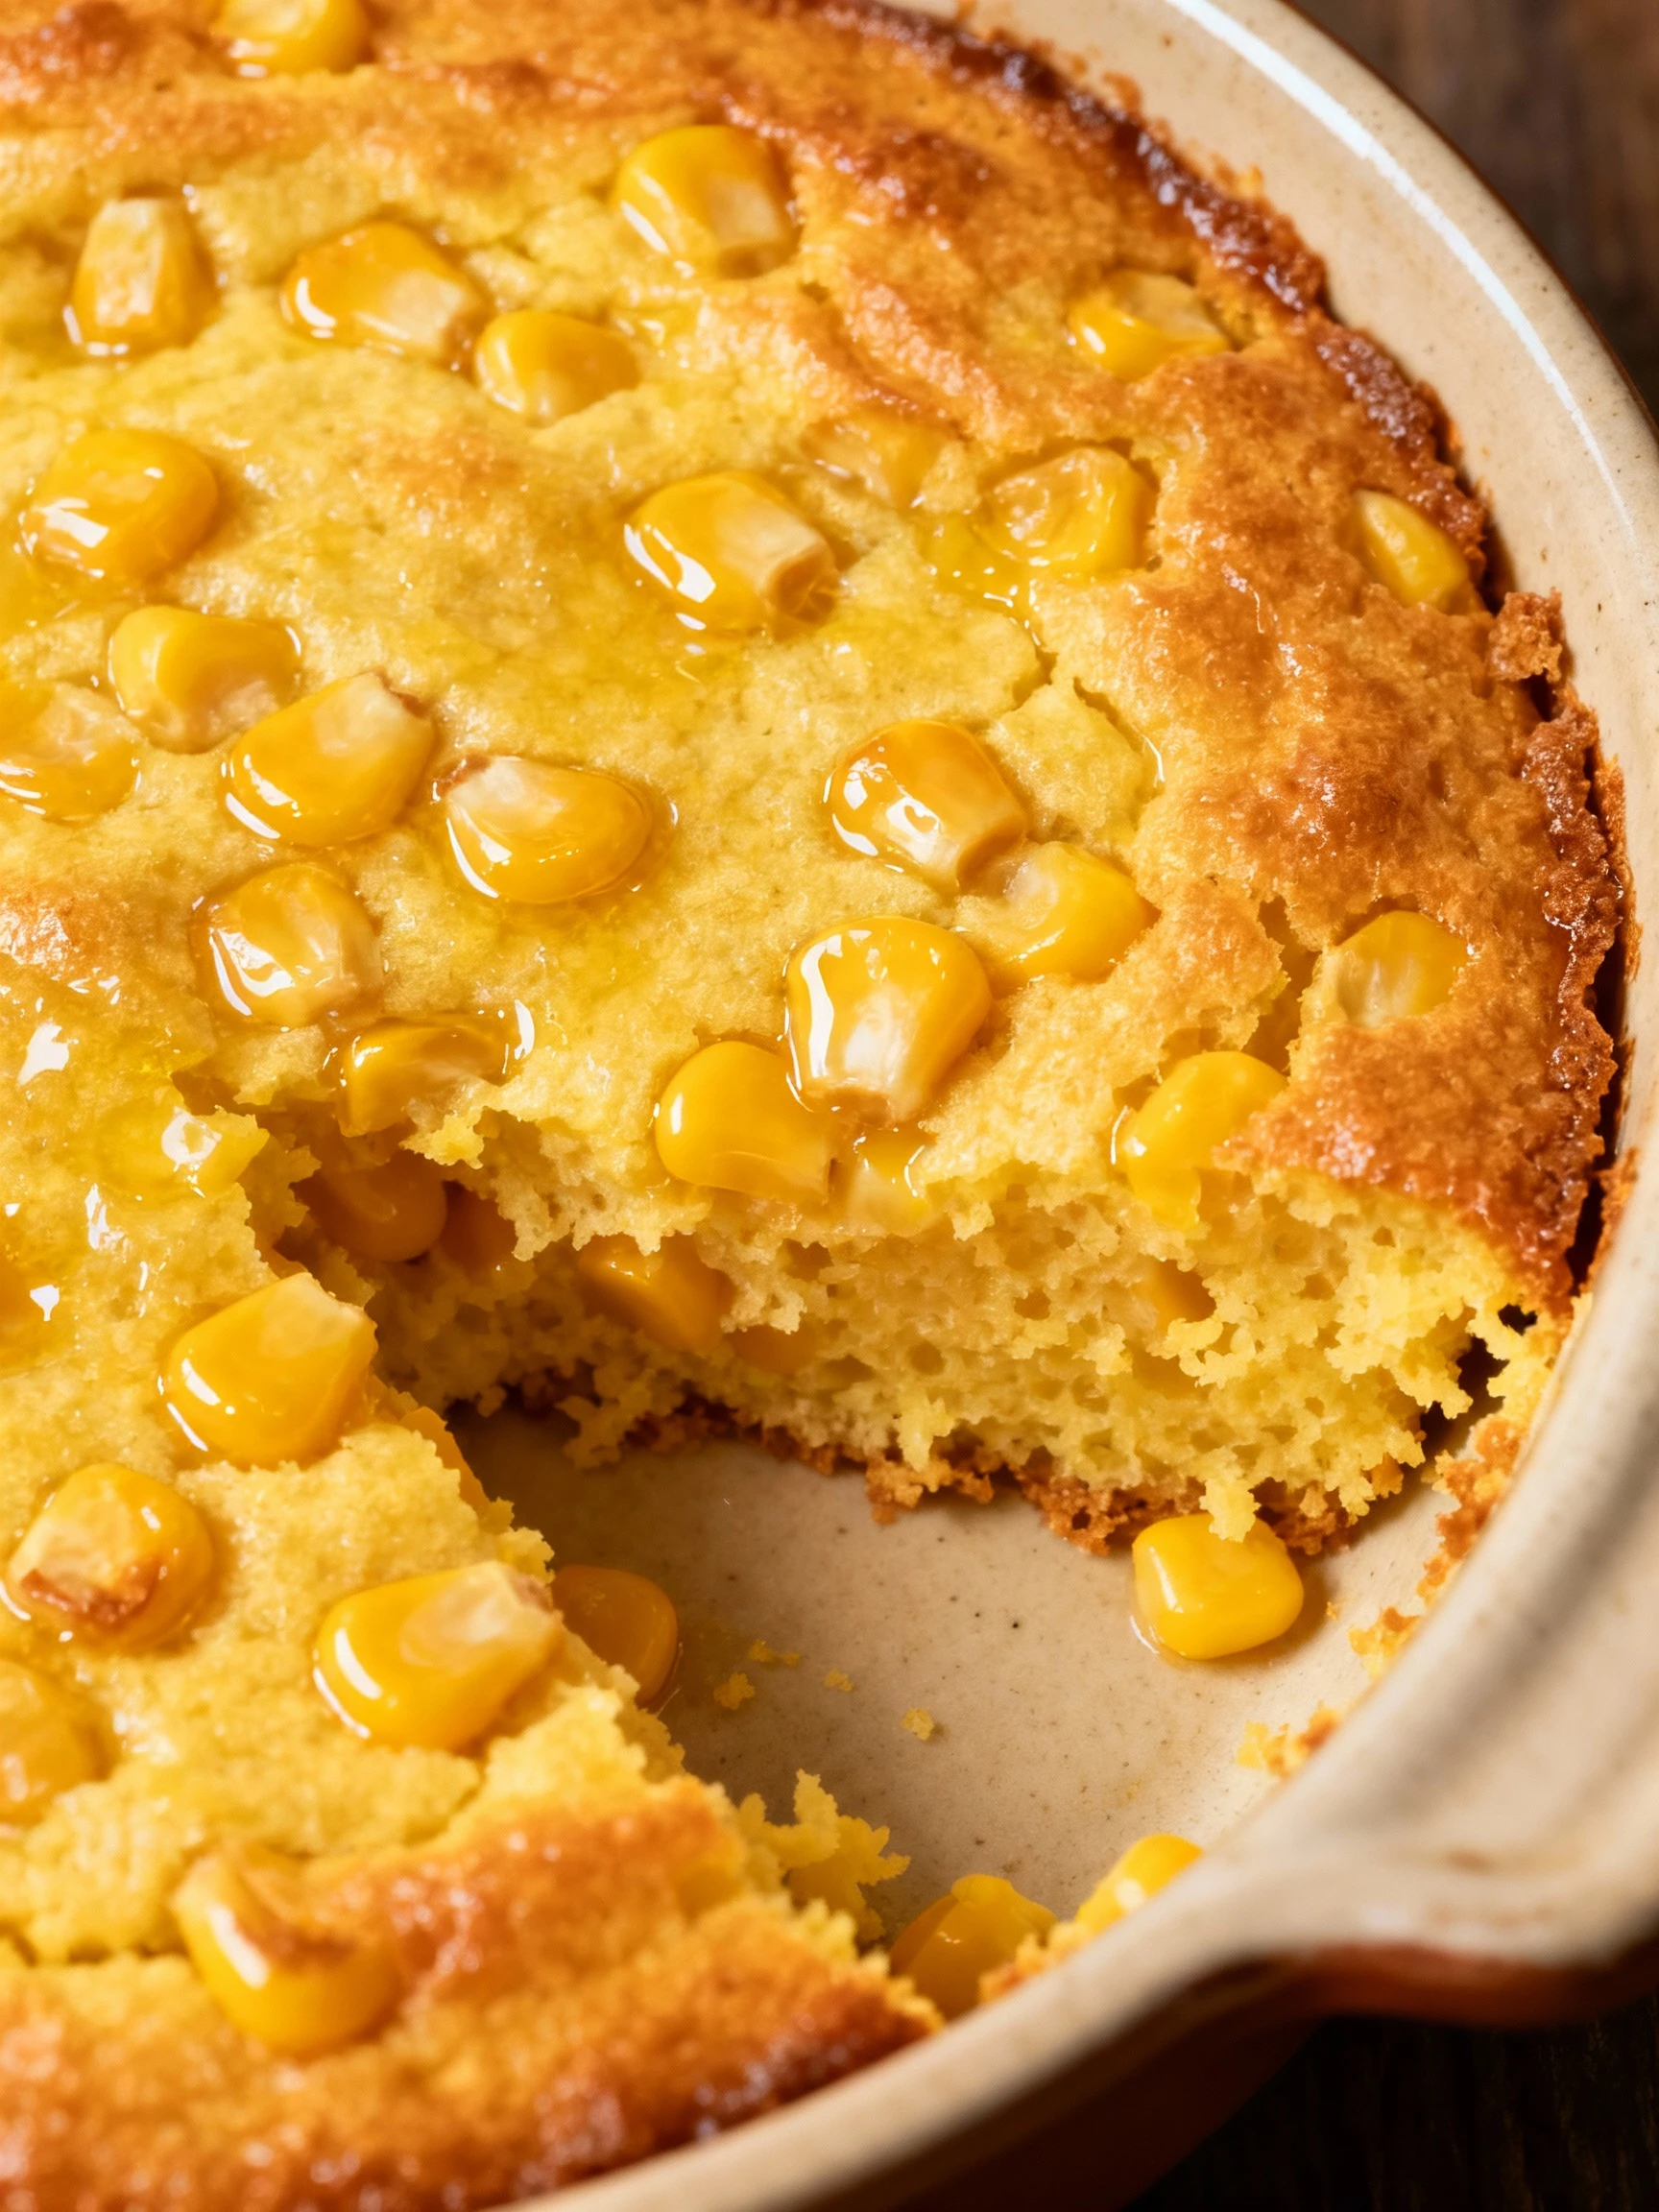
This creamy corn pudding recipe is the ultimate comfort food side dish that’s perfect for holidays and family dinners. With its sweet corn flavor and custardy texture, it pairs wonderfully with everything from holiday hams to weeknight roasts. For another comforting slow-cooked favorite, try this Slow Cooker Lasagna Soup Recipe. This easy corn pudding comes together quickly and bakes to golden perfection.
Ingredients
This creamy, sweet Corn Pudding is a comforting side dish with a rich custard texture and bursts of juicy corn in every bite.
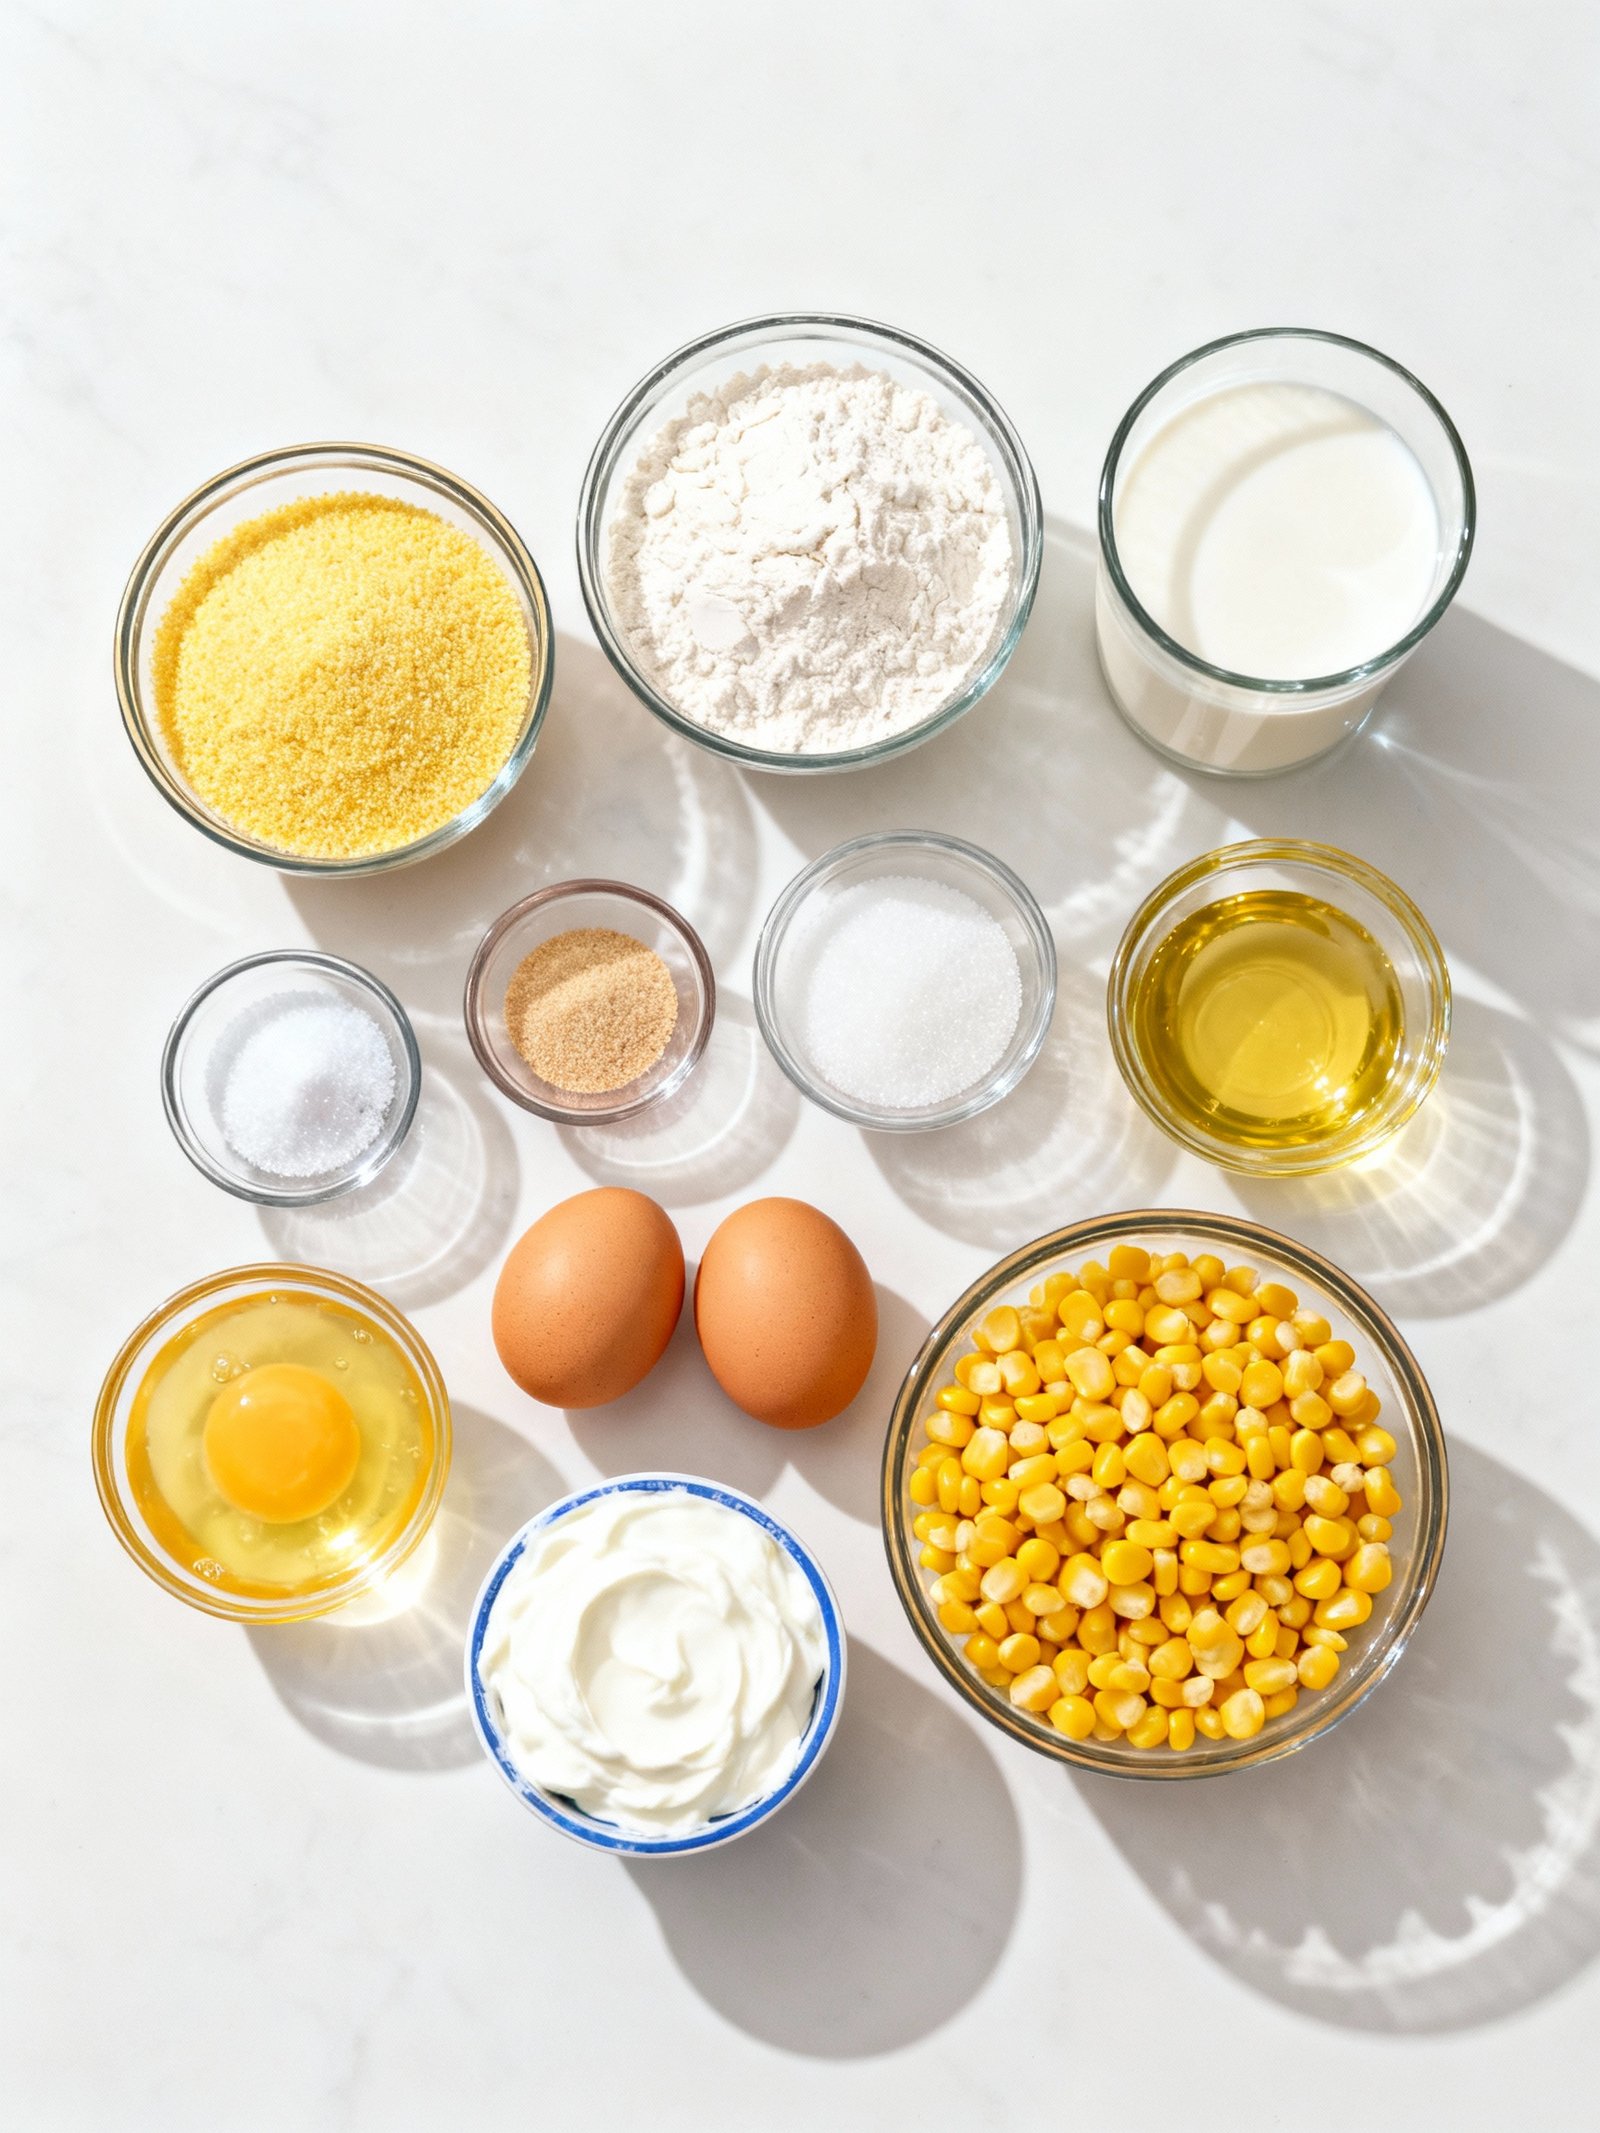
- 2 cups fresh corn kernels (or frozen or canned, drained)
- 3 large eggs
- 1 cup whole milk (or half-and-half for extra richness)
- 1/4 cup granulated sugar
- 2 tablespoons all-purpose flour
- 1/2 teaspoon baking powder
- 1/4 cup unsalted butter, melted
- 1/2 teaspoon salt
- 1/4 teaspoon black pepper
Timing
| Prep Time | 15 minutes |
| Cook Time | 45 minutes |
| Total Time | 1 hour |
Context: This Corn Pudding recipe is about 20% faster than similar recipes thanks to its straightforward preparation and efficient baking time.
Step-by-Step Instructions
Step 1 — Prepare Your Ingredients
Gather 4 cups of corn kernels (fresh, frozen, or canned), 4 large eggs, 1 cup of heavy cream, 1/2 cup of milk, 1/4 cup of granulated sugar, 1/4 cup of all-purpose flour, 1/2 cup of melted butter, and 1 teaspoon of salt. If using frozen corn, thaw it completely and drain any excess liquid to prevent a watery Corn Pudding.
Step 2 — Preheat Oven and Prepare Baking Dish
Preheat your oven to 350°F (175°C). Grease a 9×13-inch baking dish with butter or non-stick spray. This ensures your Corn Pudding doesn’t stick and bakes evenly.
Step 3 — Whisk Wet Ingredients
In a large mixing bowl, whisk the eggs until smooth and slightly frothy. Add the heavy cream, milk, melted butter, and sugar, whisking until fully combined. A uniform mixture helps create a creamy, cohesive pudding texture.
Step 4 — Incorporate Dry Ingredients
Sift the flour and salt into the wet mixture, whisking continuously to avoid lumps. Stir until the batter is smooth and all dry ingredients are fully incorporated. For extra flavor, consider adding a pinch of black pepper or a dash of paprika.
Step 5 — Fold in Corn Kernels
Gently fold the corn kernels into the batter using a spatula. Avoid overmixing to keep the corn intact. For a richer Corn Pudding, you can mix in 1 cup of shredded cheddar cheese at this stage.
Step 6 — Transfer to Baking Dish
Pour the Corn Pudding mixture into the prepared baking dish, spreading it evenly with the spatula. Tap the dish lightly on the counter to remove any air bubbles, which helps achieve a uniform bake.
Step 7 — Bake to Perfection
Place the dish in the preheated oven and bake for 45–55 minutes. The Corn Pudding is done when the top is golden brown and the center is set (a toothpick inserted should come out clean). If the top browns too quickly, cover loosely with foil.
Step 8 — Cool Before Serving
Remove the Corn Pudding from the oven and let it cool for 10–15 minutes. This allows the pudding to firm up slightly, making it easier to slice and serve. It will continue to set as it cools.
Step 9 — Serve and Store
Slice the Corn Pudding into squares and serve warm. Leftovers can be stored in an airtight container in the refrigerator for up to 3 days. Reheat in the oven or microwave until warmed through.
Corn Pudding Nutrition Facts
| Calories | 210 |
| Protein | 6g |
| Carbohydrates | 28g |
| Fat | 9g |
| Fiber | 2g |
| Sodium | 320mg |
Note: Estimates based on typical ingredients and serving size.
Healthier Alternatives
- Greek yogurt for sour cream — Boosts protein while maintaining creamy texture with a pleasant tang.
- Coconut milk for heavy cream — Creates a rich, dairy-free version with subtle tropical notes.
- Almond flour for all-purpose flour — Offers a gluten-free, slightly nutty alternative that binds well.
- Cauliflower rice for some corn — Lowers carbs and calories while adding a mild, versatile base.
- Low-sodium vegetable broth — Reduces salt content without sacrificing savory depth.
- Nutritional yeast for some cheese — Adds a cheesy, umami flavor while being dairy-free and lower in fat.
- Stevia for sugar — Cuts refined sugar content while keeping the corn pudding lightly sweet.
Serving Suggestions
- Pair this creamy corn pudding with roasted chicken or grilled pork chops for a comforting family dinner.
- Serve alongside holiday favorites like baked ham or roast turkey for a festive side dish.
- Complement with fresh green vegetables like steamed green beans or a crisp garden salad.
- Top individual servings with crispy fried onions or fresh chives for added texture and flavor.
- Offer as a potluck contribution—it travels well and appeals to all ages.
- Garnish with a sprinkle of smoked paprika or fresh parsley for a colorful finish.
This corn pudding is wonderfully versatile—bake it in a cast-iron skillet for rustic presentation, or in a ceramic dish for elegant gatherings.
Common Mistakes to Avoid
- Mistake: Using canned creamed corn, which adds excess liquid and a metallic taste. Fix: Opt for fresh or frozen corn kernels blended with a bit of heavy cream for superior flavor and texture control.
- Mistake: Overmixing the batter, which develops too much gluten and results in a dense, rubbery pudding. Fix: Gently fold the wet and dry ingredients until just combined; a few lumps are perfectly fine.
- Mistake: Baking at too high a temperature, causing the edges to burn before the center sets. Fix: Use a moderate 350°F (175°C) oven and bake in a water bath for gentle, even heat distribution.
- Mistake: Skipping the resting time after baking, leading to a soupy, collapsed texture. Fix: Let the corn pudding rest for at least 15-20 minutes; it will continue to firm up as it cools slightly.
- Mistake: Not properly seasoning the base, resulting in a bland final dish. Fix: Season your custard mixture generously with salt and pepper before baking, as the sweetness of the corn needs this balance.
- Mistake: Using only whole corn kernels, which can make the pudding texture uneven. Fix: Pulse half the corn in a food processor to create a creamy base while keeping the other half whole for pleasant bursts of sweetness.
- Mistake: Adding cold ingredients straight from the refrigerator, which can disrupt cooking time. Fix: Bring eggs, milk, and other dairy to room temperature so they incorporate smoothly and bake evenly.
- Mistake: Undercooking the pudding, so the center remains jiggly and uncustardy. Fix: Bake until the edges are golden and the center shows just a slight jiggle; it will set fully as it rests.
Storing Tips
- Fridge: Cool your corn pudding completely, then store in an airtight container for up to 4 days.
- Freezer: Transfer cooled corn pudding to a freezer-safe container or bag; it will keep for up to 3 months.
- Reheat: Thaw if frozen, then reheat in the oven at 350°F until the internal temperature reaches 165°F.
Always allow your corn pudding to cool to room temperature before refrigerating or freezing to maintain food safety and texture.
Conclusion
This creamy corn pudding makes a wonderful side dish for holiday meals and family gatherings. Its sweet corn flavor and comforting texture pair perfectly with roasted vegetables and stuffing dishes. Give this easy corn pudding recipe a try and share your results in the comments below!
PrintCorn Pudding

A creamy, custard-like corn casserole that is a classic Southern side dish, perfect for holidays or family dinners.
- Prep Time: 15 minutes
- Cook Time: 55 minutes
- Total Time: 1 hour 10 minutes
- Yield: 8 1x
- Method: Side Dish
- Cuisine: Southern American
Ingredients
- 1 cup yellow cornmeal
- 1 cup all-purpose flour
- 1/2 cup sugar
- 1 tablespoon baking powder
- 1 teaspoon salt
- 2 cups whole milk
- 1/2 cup unsalted butter, melted
- 2 large eggs, beaten
- 2 cups fresh or frozen corn kernels
- 1 cup sour cream
Instructions
- Preheat oven to 350°F (175°C). Grease a 9×13-inch baking dish.
- In a large bowl, combine cornmeal, flour, sugar, baking powder, and salt.
- In another bowl, whisk together milk, melted butter, and eggs.
- Add the wet ingredients to the dry ingredients and stir until just combined.
- Fold in the corn kernels and sour cream until evenly mixed.
- Pour the batter into the prepared baking dish and smooth the top.
- Bake for 50-60 minutes or until the top is golden and a toothpick inserted in the center comes out clean.
- Let cool slightly before serving.
Notes
For best results, use fresh corn when in season. This dish can be made ahead and reheated gently before serving. Adding a pinch of cayenne pepper can add a subtle kick.
Nutrition
- Calories: 280
- Sugar: 8g
- Sodium: 400mg
- Fat: 11g
- Saturated Fat: 6g
- Unsaturated Fat: 5g
- Trans Fat: 0g
- Carbohydrates: 38g
- Fiber: 3g
- Protein: 6g
- Cholesterol: 70mg
FAQs
Can I make corn pudding ahead of time?
Yes, you can prepare corn pudding a day in advance. Assemble the dish, cover it tightly, and refrigerate. Bake it just before serving for the best texture.
What is the best type of corn to use for corn pudding?
Fresh, frozen, or canned corn all work well for this corn pudding recipe. Using fresh or high-quality frozen corn will give the best flavor and texture.
Why is my corn pudding too runny?
A runny corn pudding often results from undercooking or too much liquid. Ensure you bake it until the center is set and a knife inserted comes out clean for perfect corn pudding.


